Running YOLO on a Raspberry Pi 5: What to Expect
The Raspberry Pi 5 is a capable small board and a popular first step into edge AI. It can run YOLO detection on its CPU. Whether that is fast enough depends on the model, the input size, the export format and what else the board is doing. This article sets realistic expectations, walks through a sensible setup, and shows how to measure performance yourself rather than relying on someone else's numbers.
I will not quote frame-rate figures here. They depend on the model variant, the resolution, the runtime, the cooling and the software version, and published numbers go out of date quickly. Measure on your own board.
What the Pi 5 is, and is not
The Pi 5 has a quad-core Arm CPU and no dedicated neural accelerator. Standard YOLO inference runs on those CPU cores. This has some consequences:
- Small models at modest resolutions are practical. Large models are not.
- Throughput is enough for many monitoring tasks that do not need every frame, such as counting or alerting a few times per second.
- It is not a replacement for a GPU. If you need many streams or high frame rates at high resolution, look at an accelerator or a different board. See Raspberry Pi vs Jetson Orin Nano for Object Detection and Raspberry Pi AI Kit and Hailo Accelerators: Is It Worth It?.
The right question is not whether the Pi can run YOLO, but whether it can run your model fast enough for your task. A parking-lot counter that updates a few times per second has very different needs from a real-time safety system.
Hardware basics that matter
A few choices avoid most early trouble:
- Power. Under sustained load the board draws more current. Use the official Raspberry Pi power supply or a supply rated for the board's requirements. Under-voltage causes throttling and instability.
- Cooling. CPU inference keeps all cores busy. Without cooling the board throttles its clock to protect itself, and your speed drops over time. An active cooler helps keep performance steady. See Power, Cooling and Storage for a Reliable Edge AI Box.
- Storage. A good-quality high-endurance microSD card is fine to start with. For 24/7 logging, consider an SSD, since constant writes wear cards.
- Camera. A USB webcam, a Pi camera module or an RTSP stream from an IP camera all work. See Choosing a Camera for Computer Vision Projects.
Software setup
Use a 64-bit Raspberry Pi OS. Then create a virtual environment and install the packages you need:
sudo apt update
python3 -m venv .venv
source .venv/bin/activate
pip install ultralytics
Package availability and install steps for Arm can change, so check the current Ultralytics documentation for Raspberry Pi if an install step fails. If you plan to use ONNX Runtime, install onnxruntime for your platform.
Keep the system image and dependencies stable once things work. Reproducible environments matter on small devices, and containers help. See Dockerize a Computer Vision App for Edge and Cloud.
Choosing a model
On a CPU-only board, model size is the main lever.
- Start with the smallest variant of the model family you use, often called nano.
- Move to a larger variant only if accuracy is not sufficient and speed headroom exists.
- Reduce input resolution to speed up inference, but check that small objects are still detected.
See Nano, Small, Medium: How to Choose a YOLO Model Size for a method that starts from your hardware budget.
Also check the licence if the product is commercial. Ultralytics models are AGPL-3.0 with a commercial option, so check the current licence. See YOLO Licenses Explained: AGPL, GPL and Commercial Use.
Export formats: do not run raw PyTorch
Running the .pt model directly works, but is usually not the fastest option on a CPU. Ultralytics can export to other formats:
from ultralytics import YOLO

model = YOLO("yolo11n.pt")
model.export(format="onnx")    # ONNX
model.export(format="ncnn")    # NCNN
Then load the exported model for prediction:
onnx_model = YOLO("yolo11n.onnx")
results = onnx_model("frame.jpg")
Options to try on the Pi:
| Format | Notes |
|---|---|
| PyTorch (.pt) | Easiest, usually not the fastest on CPU |
| ONNX with ONNX Runtime | Portable, good CPU support. See Export YOLO to ONNX and Run It with ONNX Runtime |
| NCNN | A lightweight inference framework designed for mobile and Arm devices; Ultralytics documents it for Raspberry Pi |
Which one wins depends on your model and software versions. Benchmark each on your board with identical input, rather than assuming.
Tuning for the CPU
- Threads. CPU inference uses multiple threads. Runtimes let you set the thread count, and the best value is not always the maximum when other work shares the cores. Test a few values.
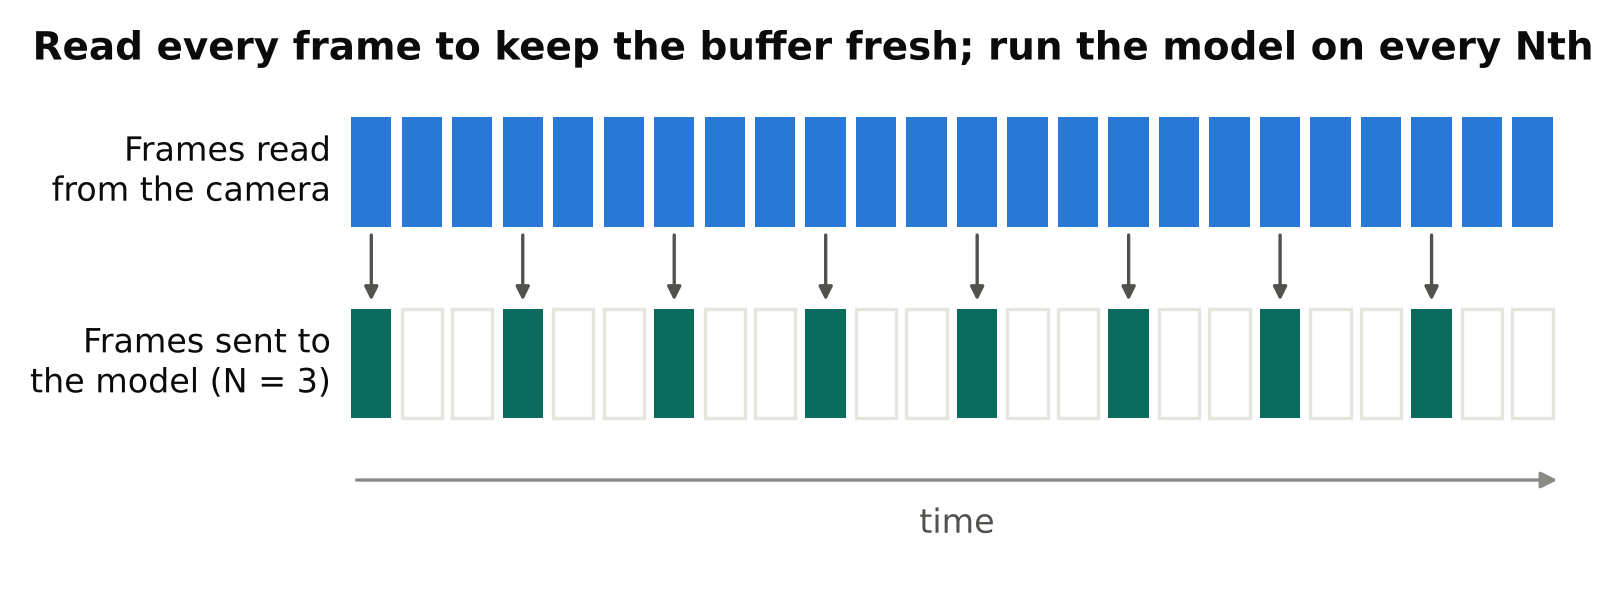
- Frame skipping. If you need detection a few times per second, do not process every frame. Read frames continuously to avoid a stale buffer, but run the model on every Nth frame.
- Resolution. Capture at a modest resolution. Decoding and resizing large frames can cost as much as inference.
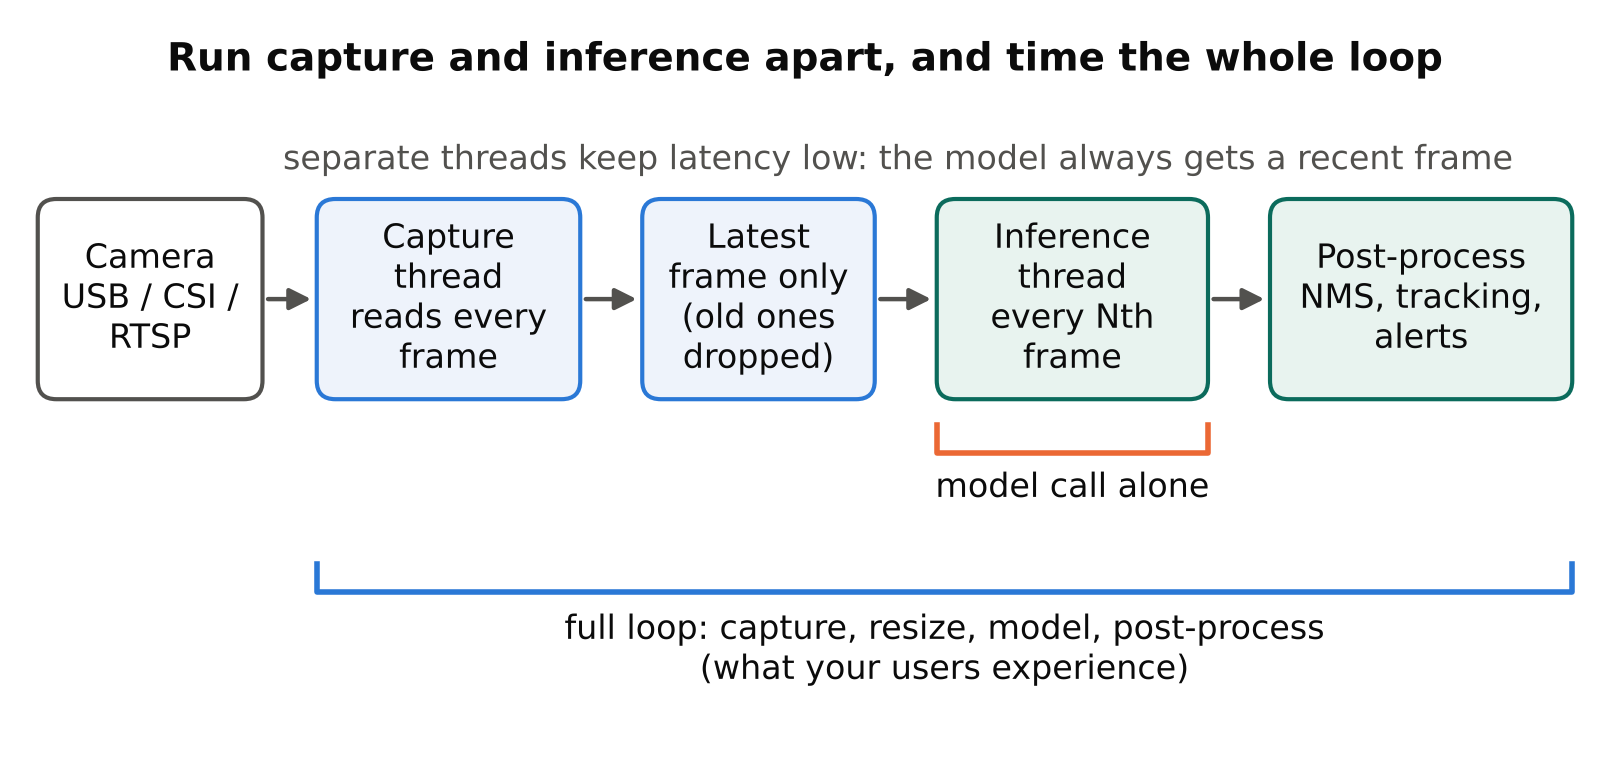
- Separate capture and inference. Read frames in one thread and run the model in another, dropping old frames so latency stays low.
- Avoid unnecessary work. Draw boxes only when you need to display. Skip saving images unless an event fires.
- Batch of one. On a CPU, large batches rarely help a live camera.
Measure it yourself
Do not trust numbers from other setups. A simple, honest method:
- Warm up: run the model several times first, because the first calls are slower.
- Time the model call alone, and also the full loop including capture, resize and post-processing. The latter is what your users experience.
- Run for long enough to include thermal effects, such as several minutes, and watch whether speed drops.
- Record the model, format, input size, thread count, cooling and power supply with the result.
- Compare one change at a time.
Full guidance is in Measuring FPS and Latency Correctly. You can check throttling with vcgencmd get_throttled and temperature with vcgencmd measure_temp. See Raspberry Pi documentation for the meaning of the values.
Realistic expectations
- A nano-class model on a Pi 5 can do useful live detection for slow-moving scenes at modest resolution. How many frames per second you get is something to measure, not assume.
- Expect lower speed than desktop numbers by a wide margin.
- Heavier models, higher resolution, multiple streams and tracking all reduce what you can do per second.
- If the measured speed is short of your need, your options are a smaller model, lower resolution, frame skipping, quantisation, or an accelerator.
For tasks like counting people crossing a line, a lower processing rate is often enough, provided the tracker still follows objects between processed frames. See People Counting with Line Crossing: A Practical Tutorial.
Common mistakes
- Running without cooling and wondering why speed drops after a few minutes.
- Using a weak power supply, causing throttling.
- Benchmarking the model only, ignoring capture and decoding.
- Comparing numbers measured with different input sizes or formats.
- Running the model on every frame of a high-resolution stream.
- Trusting a number copied from a forum post for different hardware.
Checklist
- Official power supply, active cooling and decent storage in place.
- 64-bit OS, virtual environment, pinned dependencies.
- Smallest suitable model, modest input size.
- Exported to ONNX or NCNN and compared with PyTorch.
- Thread count and frame skipping tuned.
- Speed measured end to end after warm-up, over several minutes.
- Temperature and throttling status checked.
- Licence checked for commercial use.
Next steps: export and run the model in Export YOLO to ONNX and Run It with ONNX Runtime, and learn to benchmark properly in Measuring FPS and Latency Correctly.