Nano, Small, Medium: How to Choose a YOLO Model Size
YOLO models come in sizes, usually called nano, small, medium, large and extra large (n, s, m, l, x). Picking one feels like a guess: bigger is more accurate, smaller is faster, so where do you land? A guess works badly. A short method works better. This article gives you one, built around a budget and a test, and does not rely on published speed numbers that will not match your hardware.
What the size letters change
Within a model family, the letters change the depth and width of the network. A bigger model has more layers and more channels, so it has more parameters and needs more computation per image. In general:
- Larger models can learn more subtle patterns and often score higher on hard data.
- Larger models are slower, use more memory and draw more power.
- Smaller models are faster and fit on small devices, but may miss small or unusual objects.
The relationship is not linear. Going from nano to small often brings a large gain, while going from large to extra large often brings little for a lot more cost. And on an easy, narrow problem, such as one object type on a plain background, a nano model can be enough. You cannot know without testing.
The other dial: input resolution
Image size is a second lever, and it is just as important. Models are typically run at a fixed input size, commonly 640 pixels on the long side for Ultralytics defaults. Raising it lets the model see small objects better and costs compute roughly in proportion to the pixel count. A model at higher resolution can cost more than a larger model at lower resolution.
So you have two dials: size and resolution. A useful rule of thumb is to choose resolution from your object size first, then choose the model size.
Pick resolution from the object
Look at the smallest object you must detect, and ask how many pixels it will occupy in the model input.
- Take a representative frame at the camera's native resolution.
- Measure the smallest important object in pixels.
- Work out the scale factor from the camera frame to the model input. If a 1920-pixel-wide frame is resized to 640, everything shrinks by a factor of three.
- Check the object after resizing. If it is only a few pixels across, the detector will struggle, whatever the size letter says.
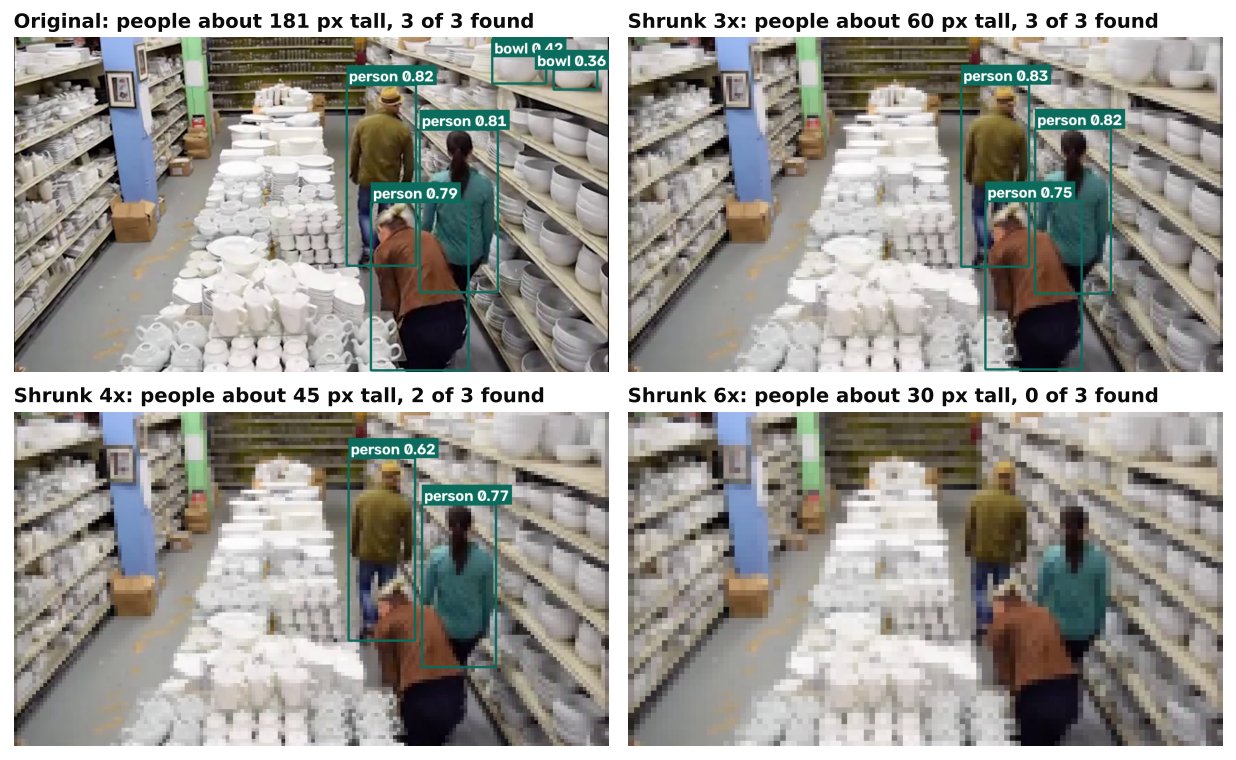
If objects are too small, options are a higher input size, cropping to the region of interest, tiling the frame, or moving the camera or changing the lens. Often the cheapest fix is a better camera position. See Class Imbalance and Small Objects for tiling.
A method for choosing
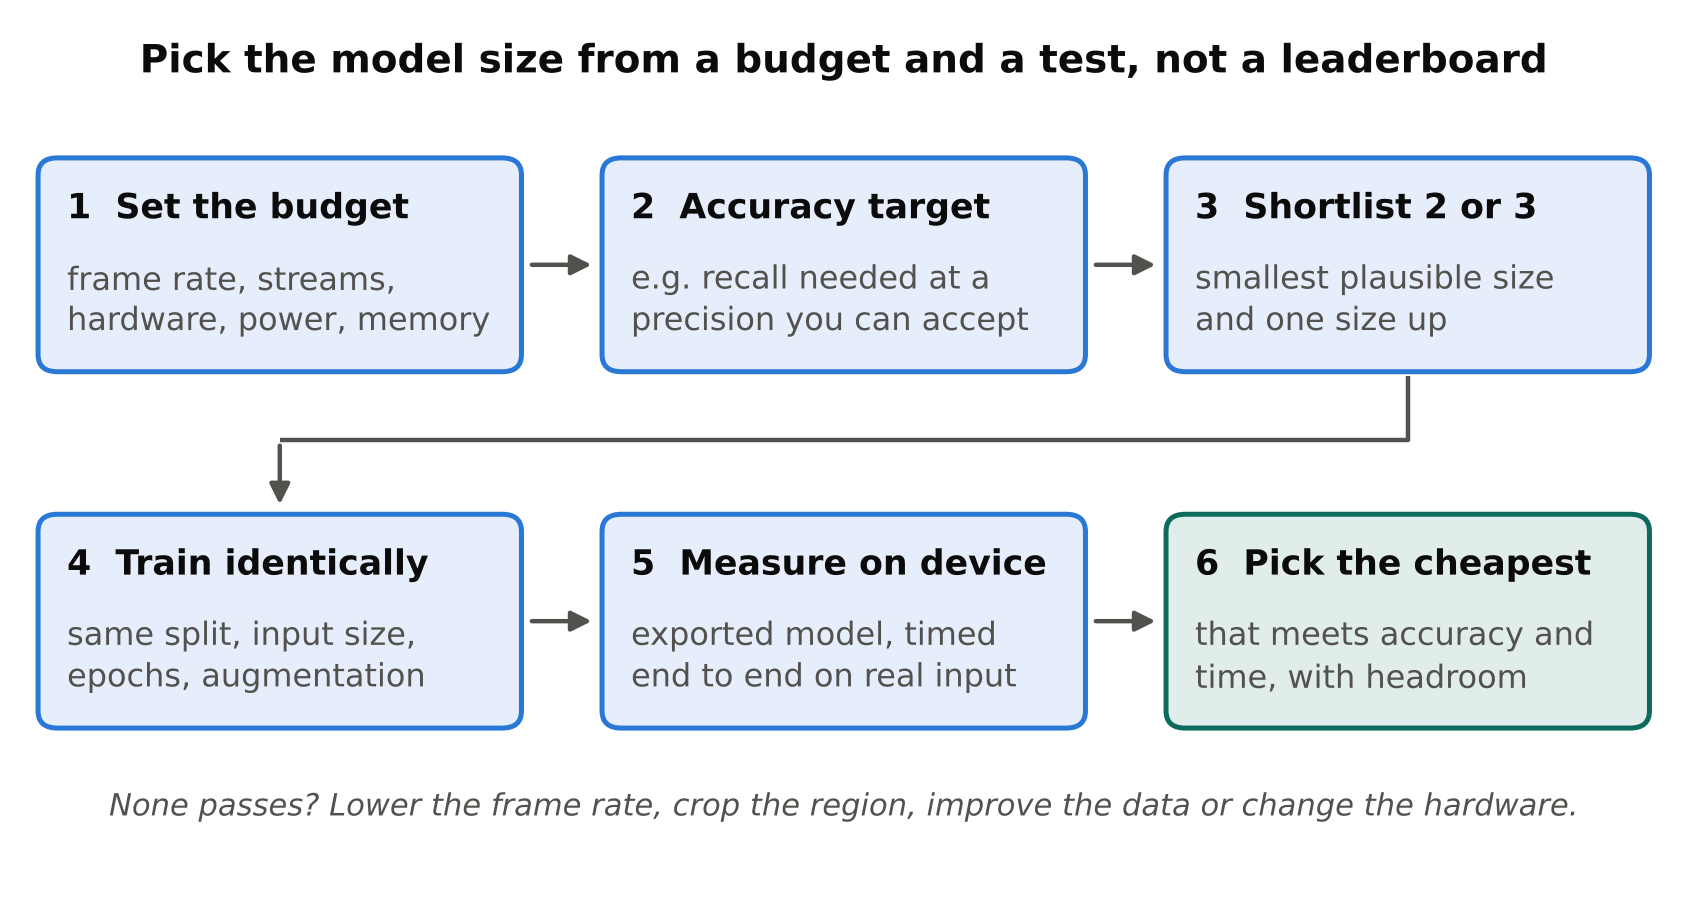
Step 1: set the budget
Write down what the deployment can afford.
| Constraint | Questions to ask |
|---|---|
| Time per frame | How many frames per second do you actually need? One per second is very different from thirty. |
| Streams per device | How many cameras share the device? |
| Hardware | CPU only, Raspberry Pi class, embedded GPU, or server GPU? |
| Power and heat | Is it battery powered or enclosed? |
| Memory | How much RAM is available alongside everything else? |
Be honest about the frame rate you need. Many analytics tasks do not need every frame. Counting people through a door, or checking if a zone is occupied, often works at a low rate. Reading fast-moving objects may need more. Lowering the processing rate is the cheapest speedup available, and it allows a bigger model.
Step 2: set the accuracy target
Define what good enough means in terms that match the job: for example, the recall you need on a certain class at a precision you can tolerate. Use the metrics from mAP, Precision and Recall. Without a target, you cannot say when a smaller model is acceptable.
Step 3: shortlist two or three candidates
Start with the smallest model that could plausibly work, and one size above it. For example, nano and small. Add medium only if both fall short on accuracy and your budget allows it.
Step 4: train under identical conditions
Use the same dataset split, the same input size, the same number of epochs and the same augmentation for each. Otherwise the comparison is unfair. With the Ultralytics package:
from ultralytics import YOLO

for weights in ["yolov8n.pt", "yolov8s.pt"]:
    model = YOLO(weights)
    model.train(data="data.yaml", epochs=50, imgsz=640, name=weights.replace(".pt", ""))
    metrics = model.val()
    print(weights, metrics.box.map50, metrics.box.map)
Change names to whichever generation you use. Keep a record of all runs.
Step 5: export and measure on the target device
Accuracy is measured on any machine. Speed is not. Export each candidate to the format you will deploy, run it on the real device with real input sizes and a realistic pipeline, and measure end-to-end time per frame. Include decoding, resizing and post-processing, since they can cost as much as the model on small devices. Follow the method in Measuring FPS and Latency Correctly.
Step 6: choose with a table
Fill in a simple comparison and decide.
| Candidate | Recall at chosen threshold | Precision | End-to-end time per frame | Memory | Meets budget? |
|---|---|---|---|---|---|
| Nano at 640 | measured | measured | measured | measured | yes or no |
| Small at 640 | measured | measured | measured | measured | yes or no |
| Nano at higher resolution | measured | measured | measured | measured | yes or no |
Pick the cheapest row that meets both the accuracy target and the time budget. If none does, change something else: reduce the frame rate, crop the region, improve the data, or upgrade the hardware.
Rules of thumb that help
- Start small. A nano or small model that meets the target is easier to deploy, cool and maintain. You can always move up.
- Data beats size. Doubling labelled examples of your hard cases often does more than moving up a size. Check labels before scaling the model. See Annotation Mistakes That Quietly Ruin Your Model.
- Resolution before size for small objects. If the problem is tiny objects, a larger model at low resolution will not help.
- Test the hard cases. Night, rain, glare and crowding often reveal a gap that overall metrics hide.
- Leave headroom. Do not pick a model that uses 100 percent of your time budget. Other processes, thermal limits and spikes will bite.
- One device, several streams. Total load is per-stream cost multiplied by the number of streams, so a small saving per frame adds up.
Common mistakes
- Choosing by leaderboard rank rather than by testing your data.
- Benchmarking on a workstation GPU, then deploying on a Raspberry Pi.
- Comparing models trained with different settings.
- Measuring only model inference time and ignoring the rest of the pipeline.
- Using the largest model "to be safe" and then lowering the frame rate to compensate.
- Forgetting that heat can slow a small device after minutes of use. Run tests long enough to see it.
Where hardware fits
If your target is a Raspberry Pi 5 class board, expect to use small models and to tune carefully. A Jetson-class board with a GPU can run larger models. For a comparison, read Raspberry Pi vs Jetson Orin Nano for Object Detection. If you want to try a small model on a Raspberry Pi 5, start with nano and measure.
Key points
- Size letters change network depth and width. Resolution is a second, equally important dial.
- Set resolution by the smallest object, then choose size.
- Define the frame rate, hardware and accuracy target before comparing models.
- Compare two or three candidates under identical training settings.
- Measure speed end to end on the target device.
- Choose the cheapest option that meets both the accuracy and time budgets, and leave headroom.
Next steps: YOLOv5 vs YOLOv8 vs YOLO11, Measuring FPS and Latency Correctly and Running YOLO on a Raspberry Pi 5.