Class Imbalance and Small Objects: Practical Fixes
Two problems appear in almost every real detection project. Some classes have far fewer examples than others, and some objects are tiny in the frame. Both make a model look fine on average while failing at the cases you care about. The rare class is often the important one, such as a safety violation, and the tiny object is often a distant person or vehicle.
This article explains why each problem happens and gives fixes in a sensible order.
Class imbalance
Why it hurts
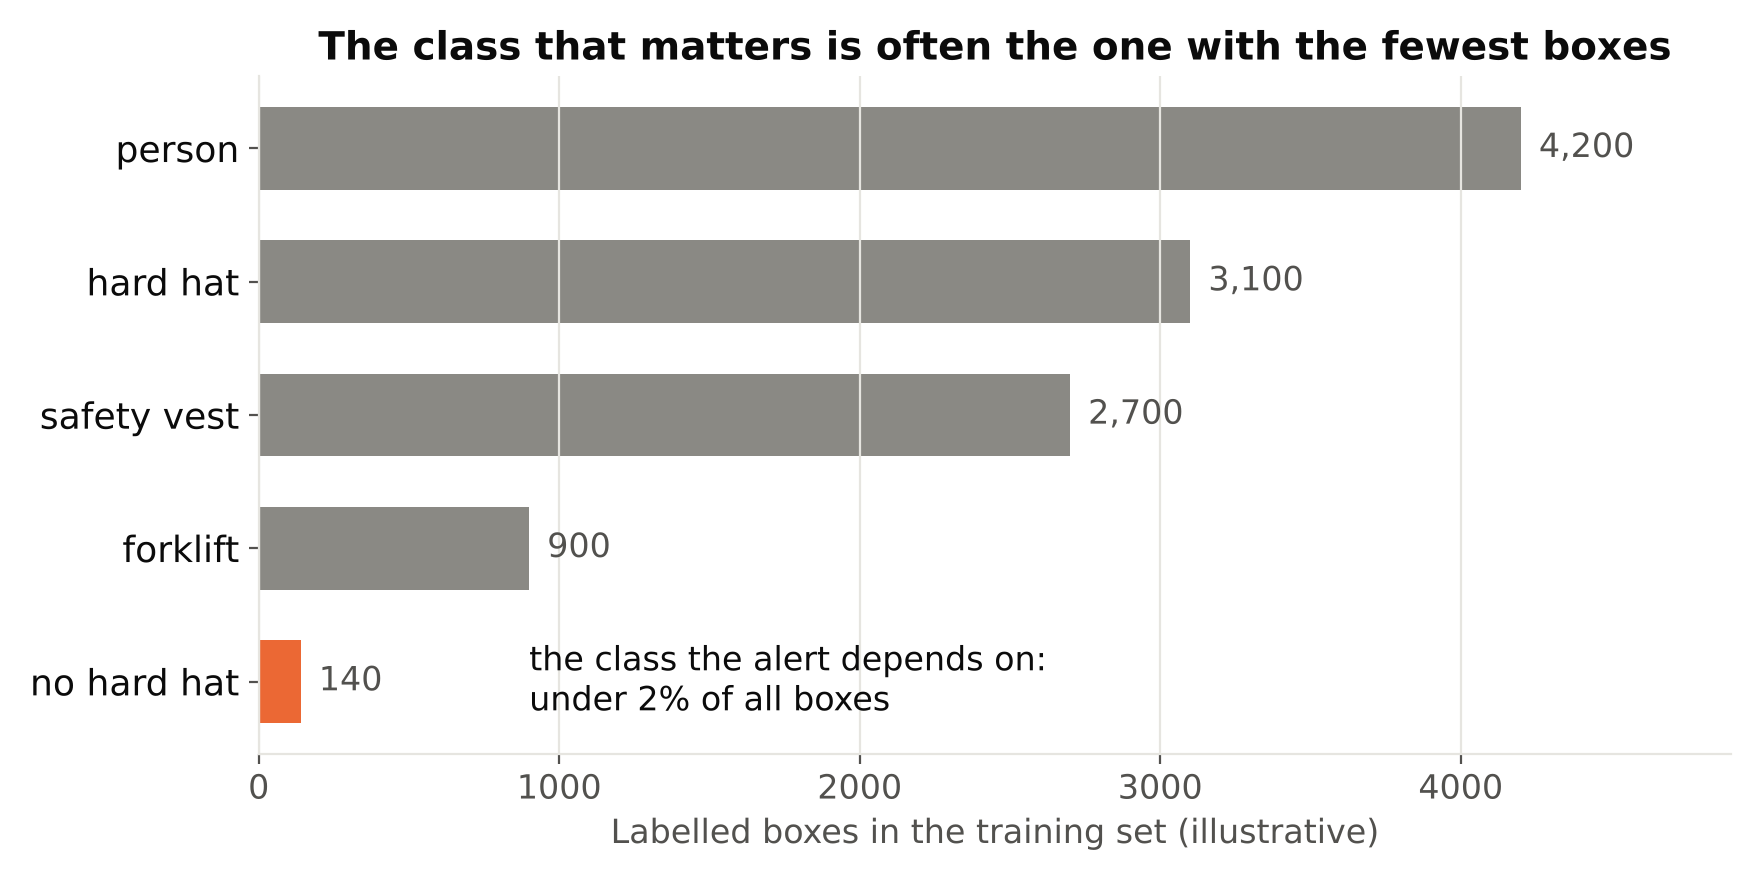
Training minimises an overall loss. If 90 percent of the boxes belong to one class, the model gets most of its reward from that class. The rare class contributes little to the loss, so the model can do poorly on it and still look good overall.
Averaged metrics hide this. A mean over classes weights each class equally, but a plain count of detections does not. Always read per-class results.
Step 1: measure it
Count instances per class in the training and validation sets, not just images. Also check how many distinct situations each class covers. A class with 300 boxes taken from three videos is weaker than it looks.
Then look at per-class precision and recall after training. A class with low recall and few examples is a candidate for the fixes below.
Step 2: collect targeted data
The most reliable fix is more real examples of the rare class, especially in varied conditions. Search your footage for the rare event, take frames from different cameras and times, and label them. If events are rare in live footage, consider running a rough model to find candidate clips, then review by hand.
Remember that rare events may be rare in validation too. Make sure the validation set contains enough examples of the rare class to give a meaningful number.
Step 3: rebalance what the model sees
Options when you cannot collect more:
- Oversample. Repeat images containing the rare class more often in training. Simple and effective, but repeating the same few images can lead to memorisation. Combine with augmentation.
- Undersample the common class. Drop some images that contain only the dominant class. This reduces training time, but throws away information, so do it modestly.
- Targeted augmentation. Apply augmentation to the rare class images. Copy-paste of rare objects onto other backgrounds can help, if the result looks natural for scale and lighting.
- Class weights. Some frameworks allow weighting the loss by class. Check what your training library supports before relying on it. In Ultralytics, many people handle imbalance through data choices rather than loss weights.
Be careful that oversampling does not change the real-world frequency the model expects. If the rare class is truly rare in deployment, the model may produce more false alarms for it after rebalancing, and you will need to tune its threshold. See Confidence Thresholds: Tuning a Detector to Cut False Alarms.
Step 4: consider the class definition
Sometimes imbalance is a sign of a bad class design. Two visually identical classes can be merged. A class that mixes very different appearances may need splitting. If a class cannot be told apart by looking at the pixels, no amount of data will fix it.
Step 5: tune per class
After training, pick the confidence threshold for each class separately. A rare, important class often deserves a lower threshold than a common one, trading more false alarms for more catches. Decide this from the precision-recall curve and the cost of each error type.
Small objects
Why they are hard
A detector looks at the image through a stack of layers that reduce resolution. By the time features reach the deeper layers, a tiny object may occupy only a pixel or two of the feature map. Fine detail is lost, and there is simply less information to learn from. Input images are also commonly resized for training and inference, which shrinks tiny objects further.
Metrics usually suffer on small objects too, because a box that is a few pixels off has a low IoU for a tiny box. See IoU and Non-Maximum Suppression, Explained with Examples.
Step 1: find out how small is small
Compute the width and height of your boxes in pixels at the size the model sees. If many boxes are only a handful of pixels in the resized input, you have a resolution problem. It is better to know this from the numbers than to assume.
Step 2: raise the input resolution
Training and running at a larger imgsz keeps more pixels on each object. This often helps the most for small objects, but it costs memory and compute, so inference gets slower. Check the cost on your target hardware. See Measuring FPS and Latency Correctly.
Train and run inference at the same resolution, or you may lose the benefit.
Step 3: use tiling
Instead of shrinking a large frame to fit the model, cut it into overlapping tiles and run the detector on each tile at full detail. Then map the boxes back to full-frame coordinates and merge duplicates from the overlap regions with NMS.
Key points for tiling:
- Overlap tiles so objects on a boundary are not cut in half. The overlap should be at least about the size of the largest object you want to catch.
- Train on tiles too if you will infer on tiles, so the model sees the same scale in both phases.
- Merge carefully. Duplicate detections from overlapping tiles must be removed, or you will double count. If you count objects, this matters.
- Mind the cost. More tiles means more inference per frame. On a multi-stream system this can multiply your compute needs.
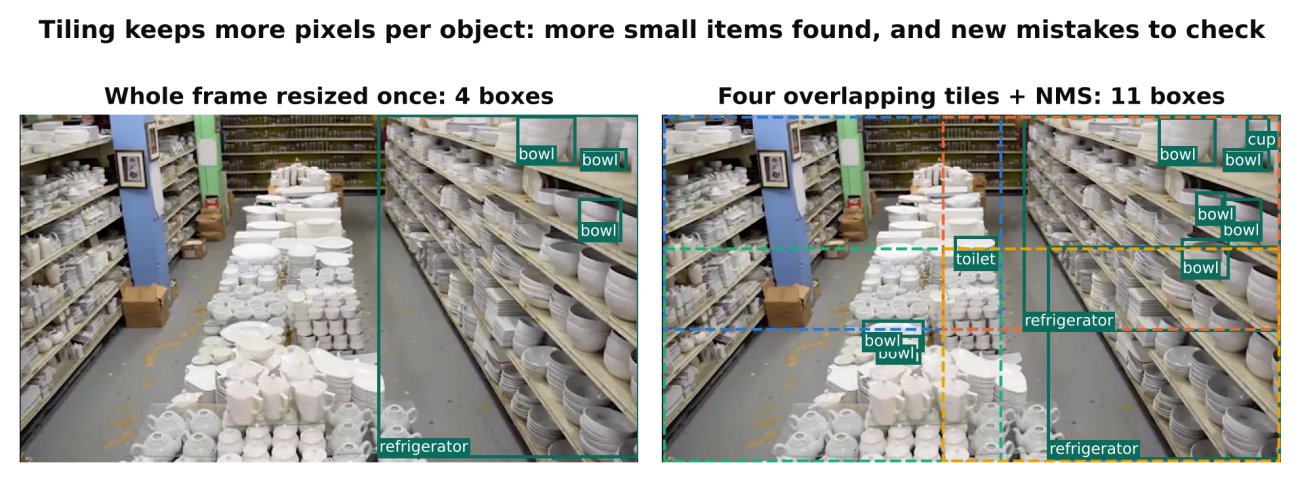
Tiling is powerful for high-resolution frames with small targets, such as aerial or wide-area cameras. For a camera where objects are already large, it is wasted work.
Step 4: improve the camera setup
Often the cheapest fix is not software. A tighter lens, a camera closer to the area of interest, a higher-resolution sensor, or a region-of-interest crop can put more pixels on the target. Review Choosing a Camera for Computer Vision Projects before spending effort on model changes.
Step 5: label carefully
Tiny objects are easy to label loosely or skip. A box that is two pixels too wide matters when the object is ten pixels wide. Set a rule for the minimum size to label and apply it consistently. See Annotation Mistakes That Quietly Ruin Your Model.
Step 6: be careful with augmentation
Strong downscaling and blur can erase small objects entirely, leaving a box around nothing. Keep scale augmentation moderate when targets are tiny.
Measuring progress honestly
- Report metrics per class and, if your tooling allows, by object size, so improvements on small objects are visible.
- Use the metric that matches the job. If you only need to know that an object is present, recall at a usable precision may matter more than strict mAP50-95. See mAP, Precision and Recall: How to Read Detection Results.
- Keep a validation set with enough rare and small examples to be meaningful. A handful gives noisy numbers.
- Always check on real footage from the target camera.
Checklist
- Count instances per class and read per-class metrics.
- Collect more real examples of rare classes before rebalancing tricks.
- Oversample or augment rare classes, then re-tune thresholds.
- Review class definitions: merge or split where the pixels demand it.
- Measure box sizes at model input resolution.
- Try larger
imgszfirst, then tiling for large frames. - Consider the camera: lens, position, resolution, region of interest.
- Label small objects consistently with a minimum-size rule.
- Judge results per class and per object size.
Next steps: read How Many Images Do You Need to Train an Object Detector? to plan targeted collection, and Confidence Thresholds: Tuning a Detector to Cut False Alarms to set per-class thresholds.