Choosing a Camera for Computer Vision Projects
Many computer vision problems are camera problems in disguise. A blurry, dark or badly placed image limits what any model can do. Before you spend time on training or buying an accelerator, make sure the camera gives your model a fair chance.
This guide covers the main camera types, the specifications that matter, and a practical way to choose.
Start with the task, not the spec sheet
Ask three questions first:
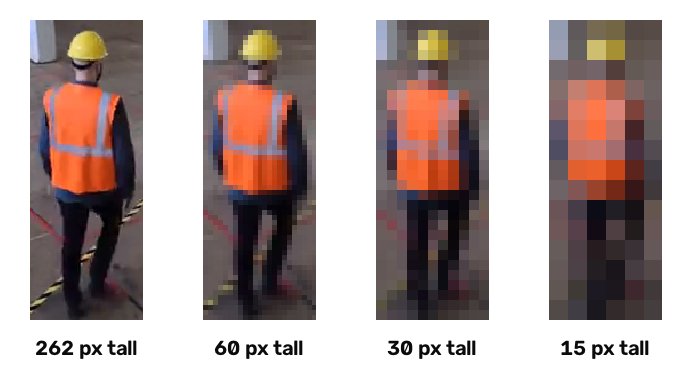
- What is the smallest detail the model must see? For example, a helmet on a person, a licence plate, a small defect on a part. This sets the pixels you need on the target.
- How fast does the subject move? Fast motion needs short exposure times and often a different sensor type.
- What is the lighting? Indoor, outdoor, day only, or day and night.
Then work backwards. A useful rule: the object you care about should cover enough pixels for a human to recognise it in the image you feed the model. If you cannot tell what it is by eye, the model will struggle too. Remember that models usually receive a resized image, so a 4K frame shrunk to a small input loses detail. Think in terms of pixels on target after resizing.
The main camera types
USB webcams
A USB webcam is the easiest way to start. It needs no network setup, works with cv2.VideoCapture on most systems and is cheap. Most use the UVC standard, so they work without special drivers.
Strengths: simple, cheap, good for prototypes, desks and short cable runs. Limits: USB cable length is short unless you use active extenders, many webcams have automatic exposure and focus that you cannot fully control, and consumer lenses are often wide with soft corners.
CSI camera modules
CSI cameras connect directly to the board's camera connector. A Raspberry Pi camera module is the common example. They offer low latency and good control over exposure and gain through the camera stack. Some variants have interchangeable lenses.
Strengths: low overhead, good control, compact. Limits: short ribbon cables, tied to specific boards and software stacks, and not suited to long distances.
IP cameras over RTSP
For anything permanent, such as workplace monitoring, traffic or retail, IP cameras are the normal choice. A PoE IP camera sends compressed video (usually H.264 or H.265) over the network using RTSP, and power comes through the same Ethernet cable from a PoE switch.
Strengths: long cable runs, weatherproof models, infrared night modes, proper lenses and mounting, many cameras on one network. Limits: you receive compressed video, so you must decode it; latency and buffering need care; and each camera has its own settings and quirks.
If you go this route, read Reading RTSP streams with OpenCV and FFmpeg and Handling RTSP dropouts. Reliable stream reading is half of a real deployment.
Depth and stereo cameras
An OAK-D camera combines an RGB camera with stereo depth and can run neural networks on the device. Depth is useful when you need distance, for example robot navigation, measuring size or separating objects by how far away they are.
Strengths: depth data, on-device processing option. Limits: higher cost, depth is noisy on textureless or shiny surfaces, and you need to learn its SDK.
Do not buy depth because it sounds advanced. If a regular camera answers your question, use that.
Specifications that matter
Resolution
More pixels are not always better. Higher resolution means more decoding work, more bandwidth and slower inference if you feed it to the model. Choose the lowest resolution that keeps your target large enough. Many detection systems run a sub-stream at lower resolution for analytics and keep the main stream for recording.
Frame rate
Match frame rate to the motion. Counting people at a door rarely needs more than a few analysed frames per second. A fast conveyor needs more. Note that the camera's frame rate and the rate you analyse can differ; you can skip frames on the analytics side.
Shutter type and exposure time
This is often overlooked. A rolling shutter reads the image line by line, so fast motion can look skewed. A global shutter captures the whole frame at once and is better for fast-moving objects. For slow scenes, rolling shutter is fine.
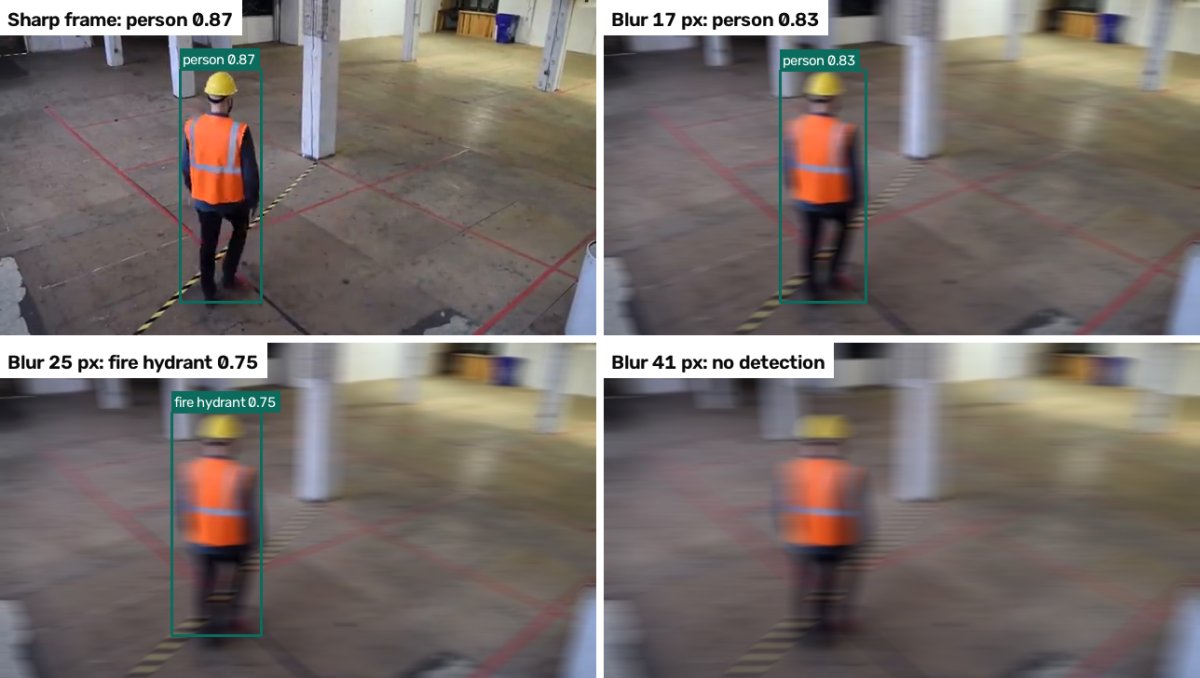
More important for most projects is exposure time. Long exposure in low light causes motion blur, and a blurred object is hard to detect. If you can, set a short fixed exposure and add light rather than letting the camera lengthen exposure at night.
Lens and field of view
A wide lens covers more area but makes objects small. A narrow lens enlarges distant targets but sees less. Wide lenses can also add distortion at the edges. Pick the field of view so that your target has enough pixels at the farthest point you care about. Many projects solve this by moving the camera closer, not by buying a higher resolution.
Low light and infrared
Night performance depends on sensor size, lens aperture and illumination. Infrared night mode gives a monochrome image, and your model may need training data from that mode. A model trained only on daytime colour images can behave very differently on infrared footage.
Video compression
Compression artefacts blur fine detail. High bitrate settings preserve more detail but cost bandwidth and storage. H.265 saves bandwidth compared with H.264, but check that your decoding path supports it well. If detections are poor, look at the actual frames your code receives, not only the camera's web preview.
Lighting beats resolution
Good, even lighting improves results more often than a more expensive camera. Practical points:
- Avoid backlight. A person in front of a bright window becomes a silhouette.
- Avoid glare and reflections on shiny surfaces.
- Keep lighting stable. Flickering lights can create banding in short exposures.
- For night scenes, use dedicated illumination suited to the camera's sensitivity.
Placement and mounting
Position matters as much as hardware.
- Mount rigidly. Vibration blurs images and shifts zones that you drew on the image.
- Choose an angle that reduces occlusion. A higher, slightly angled view helps with crowds.
- Keep the camera out of direct sun glare.
- Protect cables and use proper connectors outdoors.
How to evaluate a camera before buying many
- Record sample footage from the real location at the real times of day, including the worst lighting.
- Run your model on that footage and look at the misses.
- Check whether failures come from the image (blur, dark, small objects) or from the model.
- Only then decide whether to change the camera, the lens, the position or the training data.
In production video analytics, a common problem is trusting a short demo recorded in perfect light. Footage from the real site, across the full day, is the honest test. The pre-deployment testing checklist describes this in more depth.
Quick decision guide
| Situation | Reasonable starting point |
|---|---|
| Desk prototype, learning | USB webcam |
| Compact embedded device, short cable | CSI camera module |
| Permanent site, long cable, outdoors | PoE IP camera with RTSP |
| Need distance or 3D information | Depth or stereo camera |
| Fast-moving objects | Short exposure, global shutter, more light |
Checklist
- Target size in pixels defined, after resizing for the model.
- Lens and distance chosen so the target stays large enough.
- Exposure set to avoid motion blur; extra light added where needed.
- Night and infrared images included in test and training data.
- Real-site footage recorded across the day and tested.
- Stream decoding and latency checked on the actual device.
- Mounting rigid, glare and backlight avoided.
Next steps
Continue with Reading RTSP Streams with OpenCV and FFmpeg, then A Pre-Deployment Testing Checklist for Vision Models.