A Pre-Deployment Testing Checklist for Vision Models
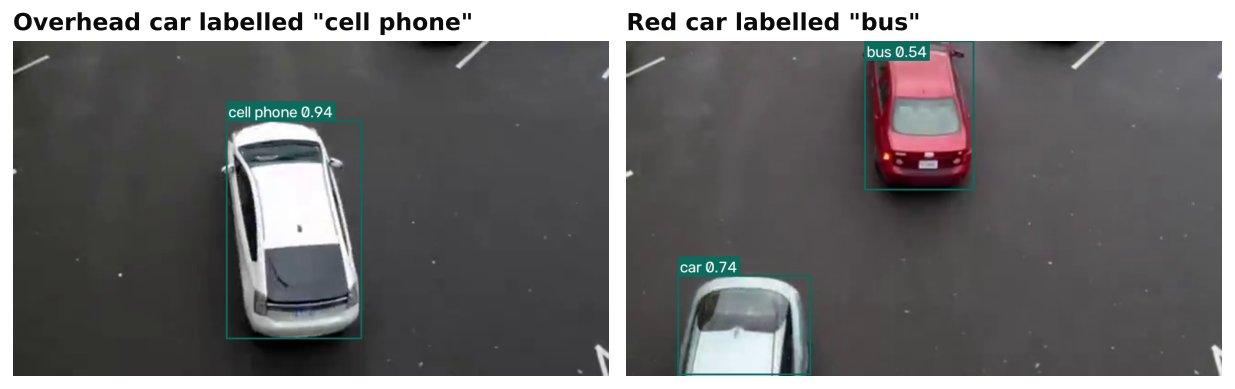
A good validation score does not mean a model is ready for a real camera. Validation data is usually cleaner, closer to the training set and easier than what a live site produces. In production video analytics, a common pattern is that a model looks fine on the test set and then fails on things nobody sampled: a night shift, a dirty lens, a camera that moved a little, or a lorry parked in the same place all day.
This checklist is for the step between "the metrics look good" and "it is live". It is organised so you can work through it in order.
1. Test on footage from the real deployment
The most valuable test is footage from the actual camera, at the actual angle, in the actual place. Not a similar camera. Not stock video.
- Collect footage covering at least the full range of conditions the camera will see: different times of day, weather, and busy and quiet periods. If that is not possible before launch, plan a supervised trial period and say so.
- Make sure this footage was not used for training or for choosing thresholds. If it was, set aside new footage. For why this matters, see train/validation split for video frames.
- Run the full pipeline, not only the model. That includes decoding, resizing, tracking, rules and alerts. Bugs often sit in the glue.
Review the output by eye. Watch the video with the boxes drawn. Ten minutes of watching will tell you things a metric will not.
2. Measure what matters for the task
Choose metrics that match the real cost of errors.
- For a safety alert, a missed event may be much worse than a false alarm. For a counting task, both errors change the number. For an alert that wakes someone at night, false alarms are expensive.
- Count events, not just frames. If a person is missed in one frame out of twenty but caught in the others, the event may still be detected. Evaluate on the unit the business cares about.
- Look at per-class results. An average can hide a weak class. See mAP, precision and recall.
- Set the confidence threshold using your own data, not the default. See confidence thresholds: tuning a detector to cut false alarms.
Write down the target before you test, for example "at most N false alerts per camera per day" or "counts within an agreed error of manual counts". Then you are measuring against a decision, not looking for a reason to say yes.
3. Cover the edge cases
List the situations that are rare but plausible, and test each on purpose.
| Edge case | What to check |
|---|---|
| Night, dusk, dawn | Does accuracy hold with low light, noise and infrared mode? |
| Glare, reflections, rain, fog | Are there false detections on wet surfaces or lights? |
| Crowds and occlusion | Do objects overlap, merge or lose IDs? |
| Unusual objects | Costumes, large loads, carts, animals, reflections in glass |
| Small or distant objects | Do they fall below the detectable size? See class imbalance and small objects |
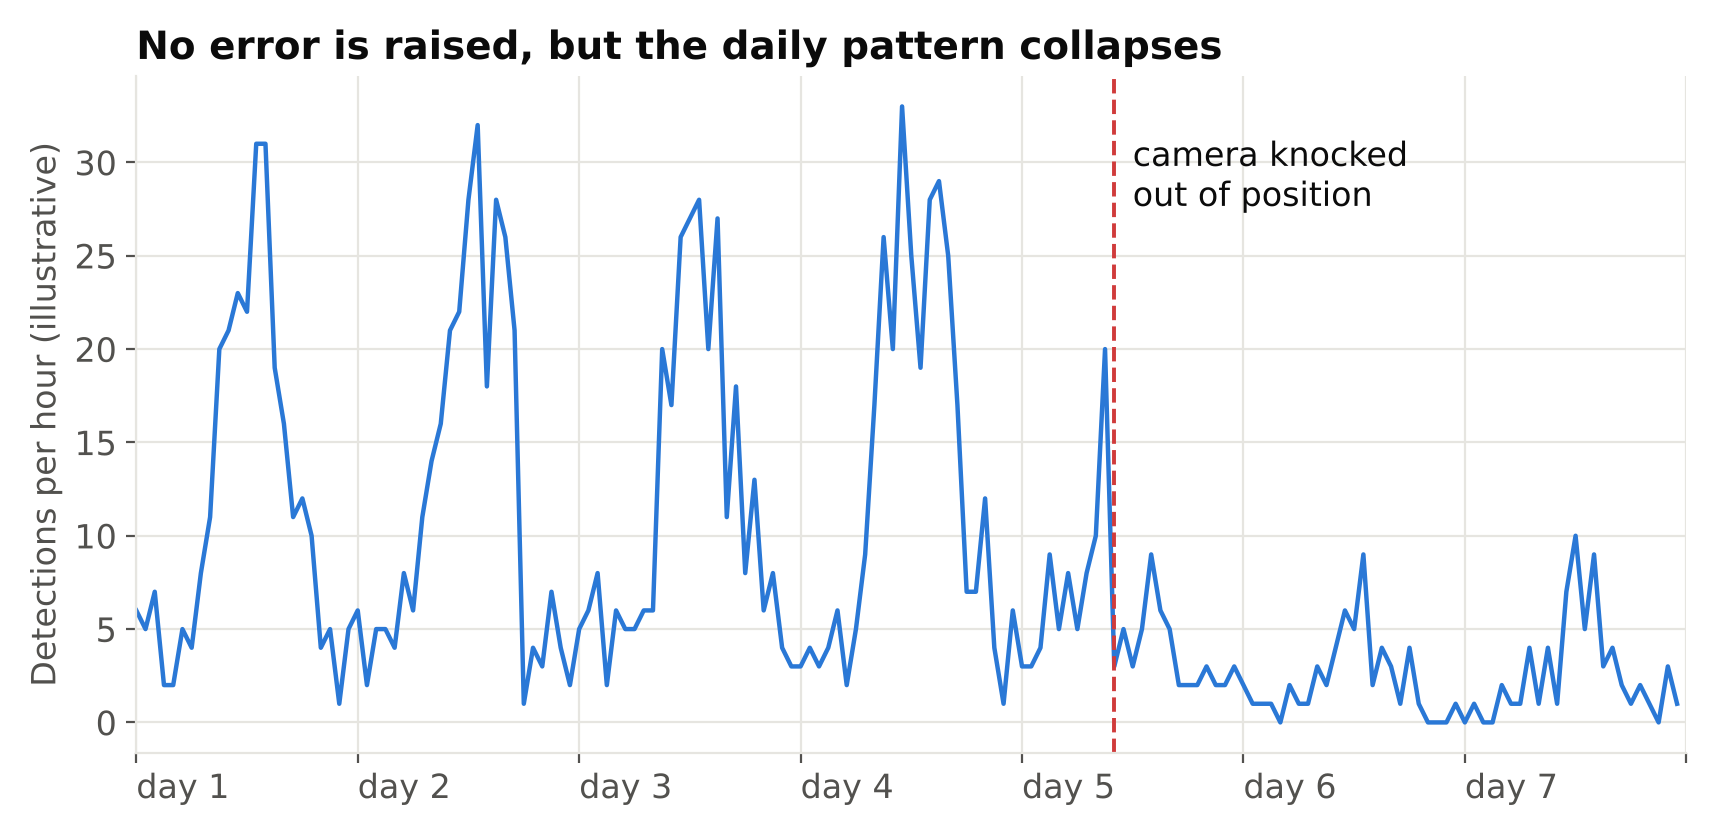
| Camera changes | Slight movement, a lens smudge, a changed exposure setting |
| Empty scenes | Does the model hallucinate objects when nothing is there? |
| Static look-alikes | Posters, mannequins, shadows, parked vehicles |
Testing empty scenes deserves emphasis. Many false alarms come from long periods with nothing happening, and a test set made only of interesting frames will not show them.
4. Test performance under real load
- Latency. Measure end to end, from frame capture to alert, not only model time. Include warm-up and use enough frames. The method is in measuring FPS and latency correctly.
- Throughput. Run all the streams you plan to run at once, on the real hardware, for a long period. One stream working says nothing about twenty. See scaling video analytics to hundreds of camera streams for what changes with scale.
- Resources. Watch CPU, GPU, memory and temperature over hours. Memory that grows slowly is a leak, and it will crash the service eventually. On small devices, check for thermal throttling. See power, cooling and storage for an edge AI box.
- Soak test. Leave it running for a day or more. Many problems only show up over time.
5. Test failure handling
Real systems fail in boring ways. Cause each failure on purpose and see what happens.
- Unplug a camera or block the network. Does the reader reconnect, and does anyone get told? See handling RTSP dropouts.
- Feed a corrupted or black frame.
- Restart the machine. Does the service start by itself, and in the right order?
- Fill the disk. Are logs and saved clips rotated or limited?
- Lose the connection to the alert destination. Are alerts queued, retried or dropped?
A system that fails silently is worse than one that fails loudly. Silence looks like "nothing happened".
6. Test the alert logic
Alerts are what people actually experience. Check:
- Schedules and time zones.
- Cooldowns, so one event does not send fifty messages.
- What happens when the same event spans a restart.
- Whether the right person receives it, and whether the message contains enough to act on, such as camera name, time and an image.
Design guidance is in designing alert rules, and ways to cut noise are in reducing false alarms in production.
7. Check privacy and compliance basics
Before going live, confirm what is stored, for how long, who can see it, and whether people on site have been informed as required where you work. Do not treat this as an afterthought. This is not legal advice. See privacy and ethics in camera analytics.
8. Prepare monitoring and rollback
Launch is the start of testing, not the end.
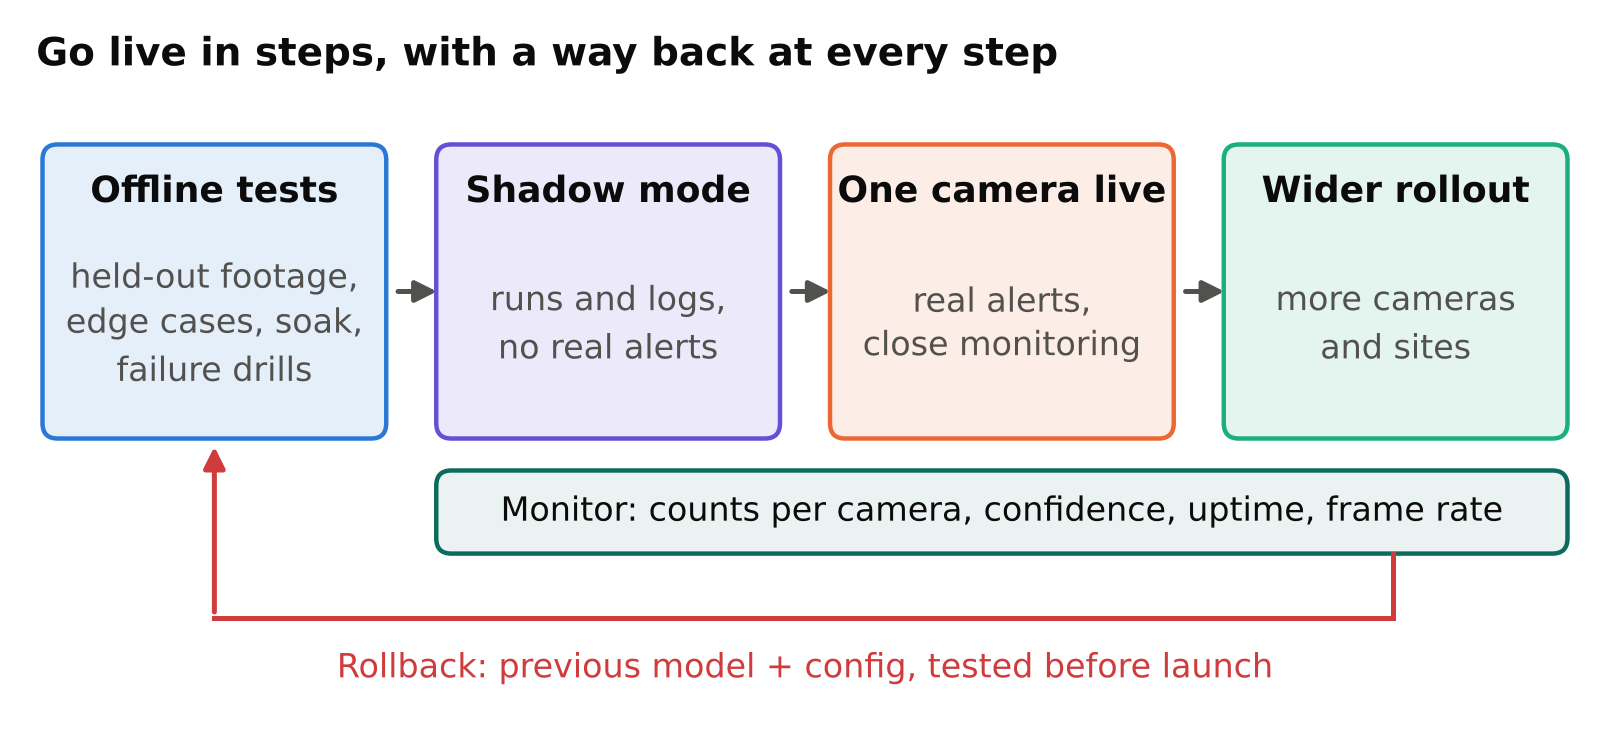
- Monitor inputs and outputs. Track detection counts per camera per hour, average confidence, stream uptime and frame rate. A sudden change often means a camera moved, the lighting changed, or the model is drifting.
- Keep a sample for review. Save a small, regular sample of frames and predictions, within your privacy rules, so a person can check quality periodically.
- Version everything. Know which model, threshold and code are running on each device.
- Have a rollback plan. Keep the previous model and configuration ready, and test that you can switch back quickly. A rollback you have never tried is not a plan.
- Roll out in steps. Start with one camera or site, in a shadow mode if possible (running and logging without sending real alerts), then widen.
9. Get sign-off with clear limits
Write a short note for the people who will use the system: what it detects, what it does not, the known weak spots, and the metrics you measured on real footage. Honest limits prevent disappointment and unfair blame later.
Checklist
- Tested on held-out footage from the real camera and site.
- Success targets written down before testing.
- Metrics measured per class and per event, with thresholds tuned on your own data.
- Edge cases covered: night, weather, crowds, empty scenes, look-alikes.
- Latency and load tested end to end on real hardware, including a long soak run.
- Failures simulated: network, camera, power, disk, alert channel.
- Alert logic reviewed: schedules, cooldowns, recipients, message content.
- Privacy and retention confirmed.
- Monitoring, versioning and a tested rollback in place.
- Staged rollout with a shadow period if possible.
Next steps: reducing false alarms in production video analytics, measuring FPS and latency correctly.