Reducing False Alarms in Production Video Analytics
A detector that scores well on a validation set can still be unusable on a live camera. The reason is arithmetic. A camera produces tens of thousands of frames per hour at typical frame rates, and even a small per-frame false positive rate yields many false alerts per day. Multiply by many cameras and the operators learn to ignore the system. A system that is ignored has failed, whatever its mAP.
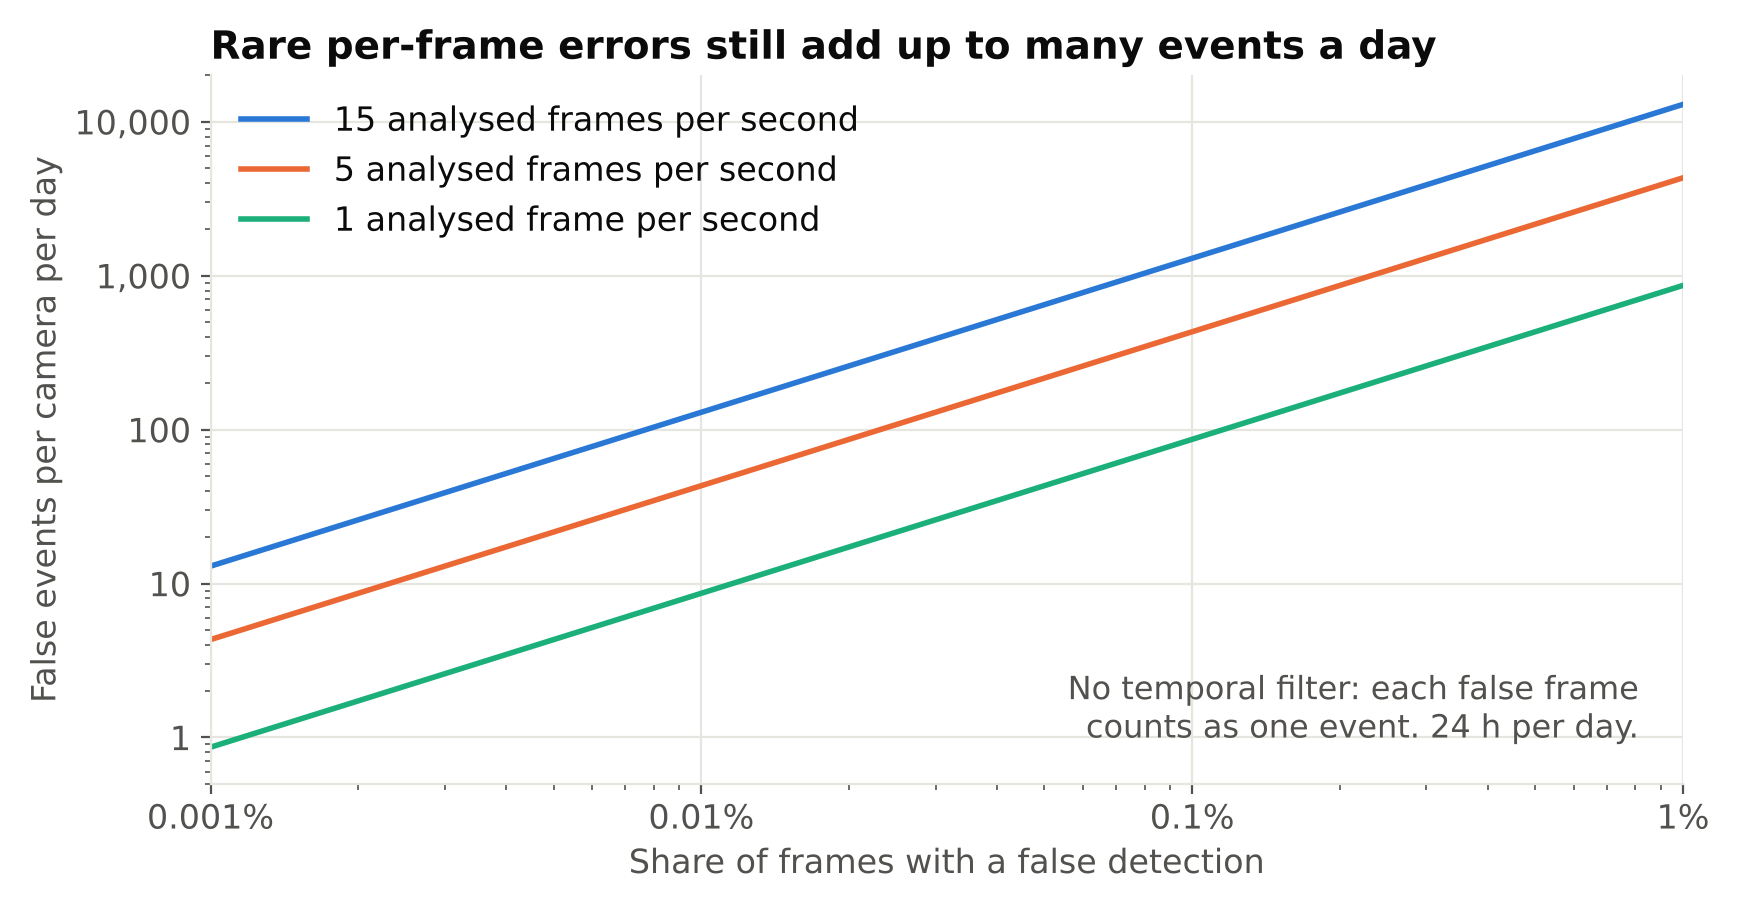
This article lists the practical levers for reducing false alarms, roughly in the order that gives the best return.
Start by classifying your false alarms
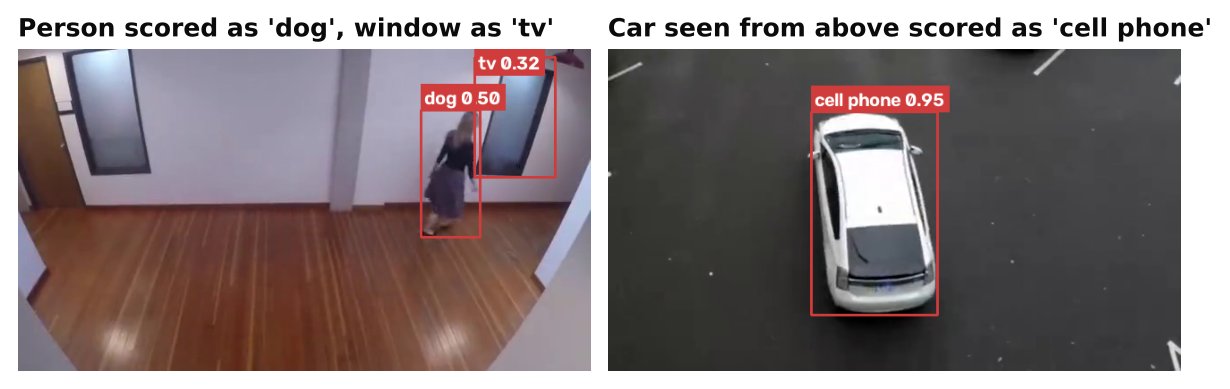
Do not tune blindly. Collect a sample of false alerts (save the frame, the detection, the confidence, the camera, and the time) and sort them into causes. Typical groups:
- Wrong object. A shadow, a coat rack, a reflection, a poster or a mannequin detected as a person.
- Right object, wrong place or time. A person detected correctly, but they are authorised, outside the zone's real boundary, or in a permitted time window.
- One-frame blips. A detection that appears for a single frame.
- Environmental. Rain, insects near a night-vision lens, headlights, sun glare, a swaying branch.
- System faults. Frozen frames, stream glitches, tracker ID switches causing double events.
Each group has a different fix. A pile of reflections points to masks or retraining. A pile of one-frame blips points to temporal filtering. Counting causes tells you which lever to pull first.
Lever 1: confidence thresholds, per class and per camera
The cheapest change is raising the confidence threshold. It trades missed detections for fewer false alarms, so make that choice deliberately with the precision-recall curve rather than by guesswork. See Confidence Thresholds: Tuning a Detector to Cut False Alarms. Two refinements matter in production:
- Use different thresholds per class. A rare, high-risk class may justify a lower threshold than a common one.
- Allow per-camera overrides. A camera with difficult lighting may need stricter settings than one in a controlled room.
Lever 2: temporal filtering
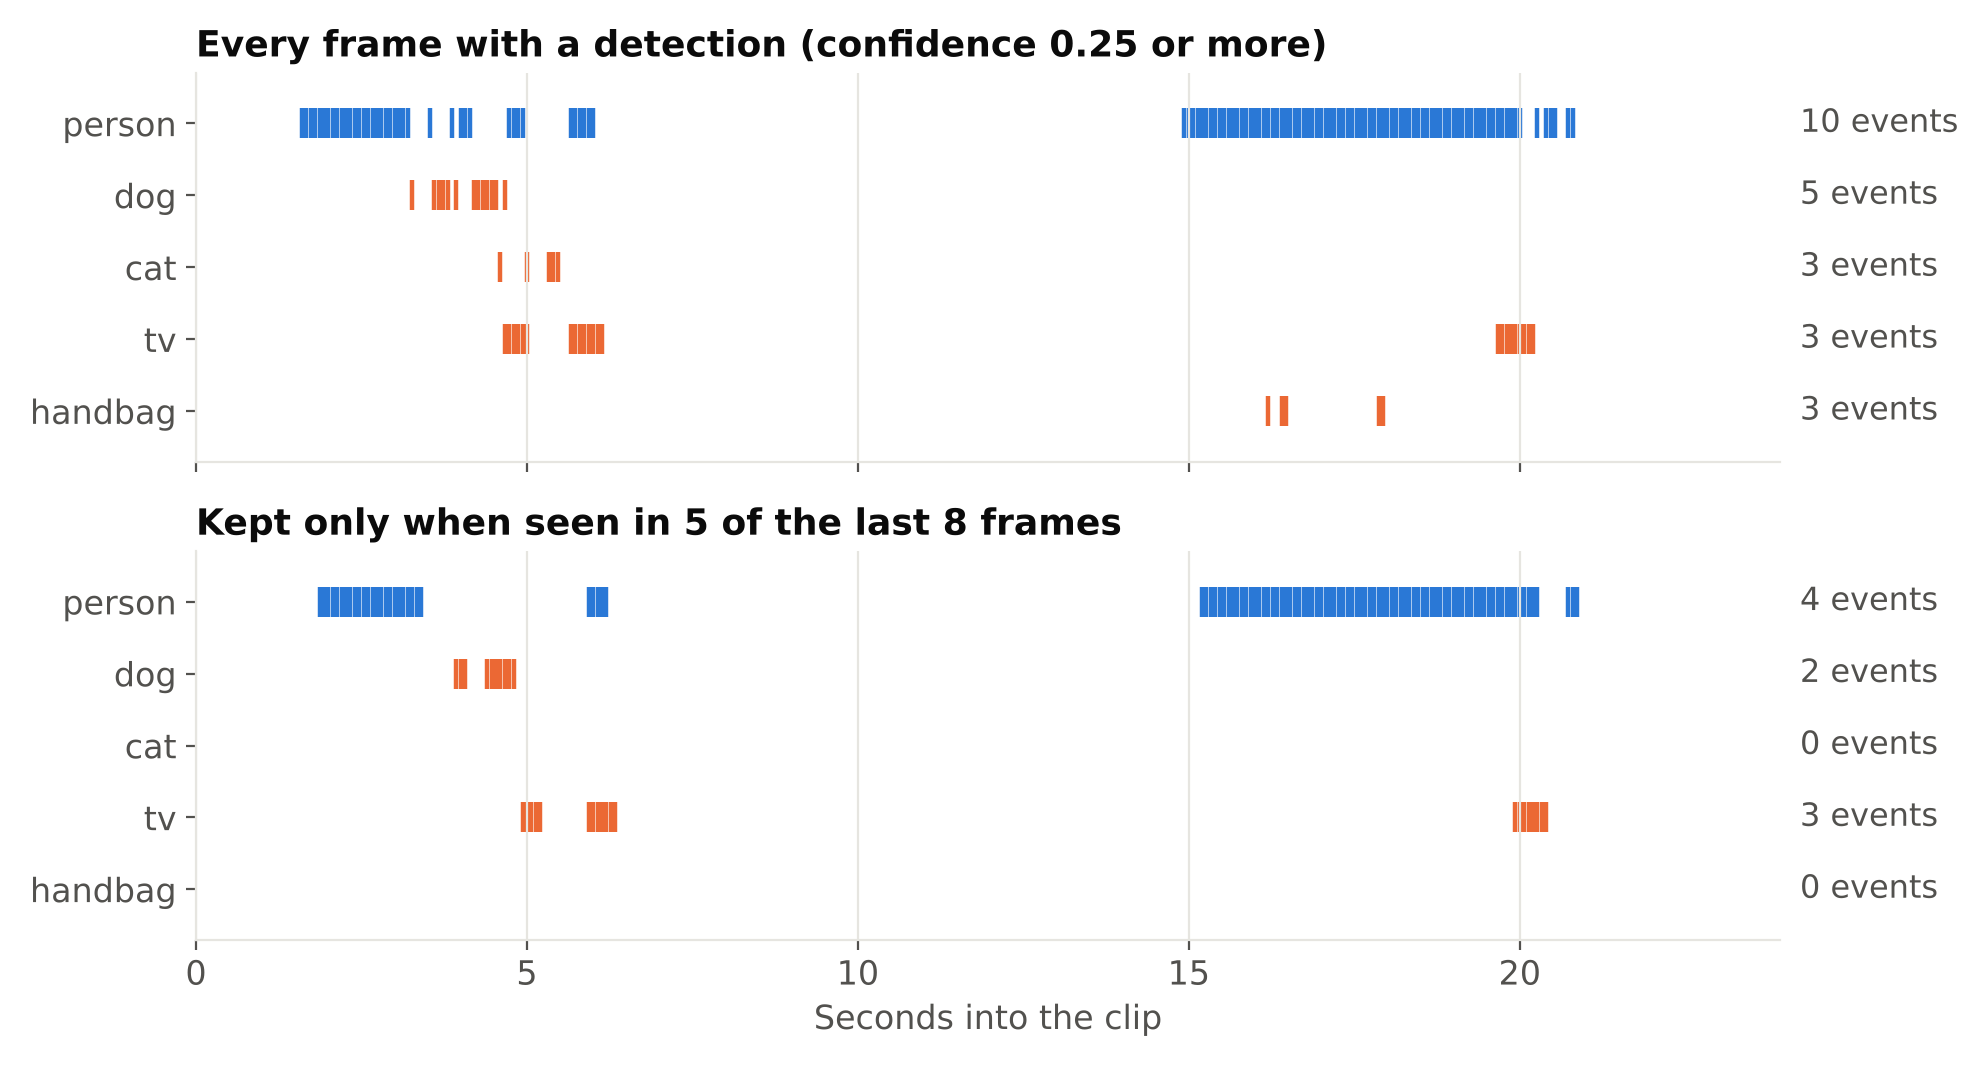
Real objects persist; many false detections do not. Require evidence over time before raising an event:
- N of M rule. Alert only if the object is detected in at least N of the last M frames.
- Minimum duration. Require the condition to hold for a number of seconds.
- Track age. Only act on tracks that have existed for a minimum number of frames. A track born for two frames is probably noise.
- Smoothing scores. Average a track's confidence over its life rather than reacting to a single spike.
The cost is added delay before an alert. For many safety and security rules a delay of a few seconds is acceptable, but for others it is not, so choose per rule. Always work in time units, not frames, so the behaviour does not change when the frame rate does.
Lever 3: geometry and size filters
Cheap rules that remove many errors:
- Region masks. Define areas where detections are ignored: a TV screen showing people, a busy road behind a fence, a reflective window. Masks are blunt, so use them where you are sure the area is irrelevant.
- Size limits. A "person" box that covers a tenth of a pixel row or half the image is probably wrong. Set minimum and maximum box sizes per camera, using the camera's perspective (size varies with distance from the camera).
- Aspect ratio limits. A standing person is taller than wide. A very wide "person" is suspect, though people lying down or crouching exist, so check against your use case.
- Motion check. For rules about moving things, require some motion. For rules about static things, such as parked vehicles, ignore transient detections.
Lever 4: context and business rules
Many "false" alarms are correct detections that the business does not care about. Use schedules (an area is only restricted at night), allow lists where feasible, and combine conditions, such as "person in zone and no vehicle present". Alert design deserves its own treatment; see Designing Alert Rules: Schedules, Cooldowns and Escalation.
Lever 5: fix the model, with the right data
If the false alarms come from a repeatable visual pattern, the proper fix is training data. Collect those false positives, add them to the dataset as images with correct labels (often meaning no label for the confusing object, so it becomes background), and retrain. Hard negatives from your own cameras are usually more valuable than more generic data.
Be careful to keep a clean validation set that does not include the same clips you trained on; otherwise you cannot tell whether things improved. See Train/Validation Split for Video Frames: Avoid Data Leakage. Check annotation consistency too, since confusing labels can create the false positives you are trying to remove: Annotation Mistakes That Quietly Ruin Your Model.
Other model-side options include a larger model or higher input resolution when the confusion is about fine detail, and a second-stage classifier that verifies crops from the detector. Each costs compute, so apply them only after cheaper levers.
Lever 6: fix the image
Many errors begin at the camera. Check:
- Exposure and lighting at night. Strong IR glare or blown highlights produce odd detections.
- Lens cleanliness, spider webs and condensation.
- Mounting stability. Wind-shaken cameras create motion artifacts.
- Field of view. Reposition or zoom to exclude areas that cause trouble.
- Compression. Very low bitrates smear detail and create blocky artifacts.
Moving a camera by a metre can remove more false alarms than a week of model work.
Monitor for drift
Performance in production changes. Seasons change the light and foliage, new equipment is installed, a sign is added, the camera gets bumped, and the lens ages. A system that was quiet in the month you tuned it may become noisy later.
Track a few signals per camera over time:
| Signal | What a change suggests |
|---|---|
| Alerts per day | New false-alarm source, or a fault if it drops to zero |
| Average detection confidence | Image quality change or domain shift |
| Detections per hour by class | Scene change or camera moved |
| Share of alerts marked false by operators | Direct quality measure |
| Time since last frame / frame change score | Stream or lens problems |
Give operators a one-click way to mark an alert as false or true, and save the frame. This feedback creates the labelled hard negatives for the next retraining round and a running estimate of precision from real use. Without feedback you are guessing.
A sudden fall to zero alerts is as suspicious as a rise. A blind or frozen camera produces no detections. See Handling RTSP Dropouts: Reconnects and Health Checks.
Test before you change
Every change in thresholds or filters moves both false alarms and missed detections. Keep a set of recorded clips with known true events and known false-alarm sources, and re-run it after each change, checking both sides. Cutting false alarms by raising a threshold is easy; proving that real events are still caught is the part that matters. Also use the process in A Pre-Deployment Testing Checklist for Vision Models before releasing changes.
Checklist
- Log and categorise false alarms before tuning.
- Tune thresholds per class and per camera.
- Add temporal filters in time units.
- Use masks, size limits and schedules where justified.
- Retrain with hard negatives from your own cameras.
- Fix the camera, lighting and mounting early.
- Monitor alert rates and operator feedback for drift.
- Re-test on recorded clips for both false alarms and misses.
Next steps: read Designing Alert Rules: Schedules, Cooldowns and Escalation and Confidence Thresholds: Tuning a Detector to Cut False Alarms.