Raspberry Pi AI Kit and Hailo Accelerators: Is It Worth It?
A Raspberry Pi can run small object detectors on its CPU. An AI accelerator add-on promises much more throughput for a modest extra cost. The Raspberry Pi AI Kit pairs a Hailo accelerator module with an M.2 connection for the Raspberry Pi 5. Is it worth buying? It depends on your workload, and on how much toolchain work you are willing to take on.
This article explains what an accelerator changes, what it costs you in effort and how to decide. It does not quote frame rates, because they depend on the model, input size, pipeline and software version. Where speed matters, measure it with your own model.
What the kit is
At a high level, the AI Kit has two parts: an M.2 module with a Hailo neural network accelerator, and the hardware to connect it to the Pi 5's PCIe interface. The Raspberry Pi 5 is the board it is designed for. Check the current product page for exact specifications, supported models and software requirements, since these details are updated over time.
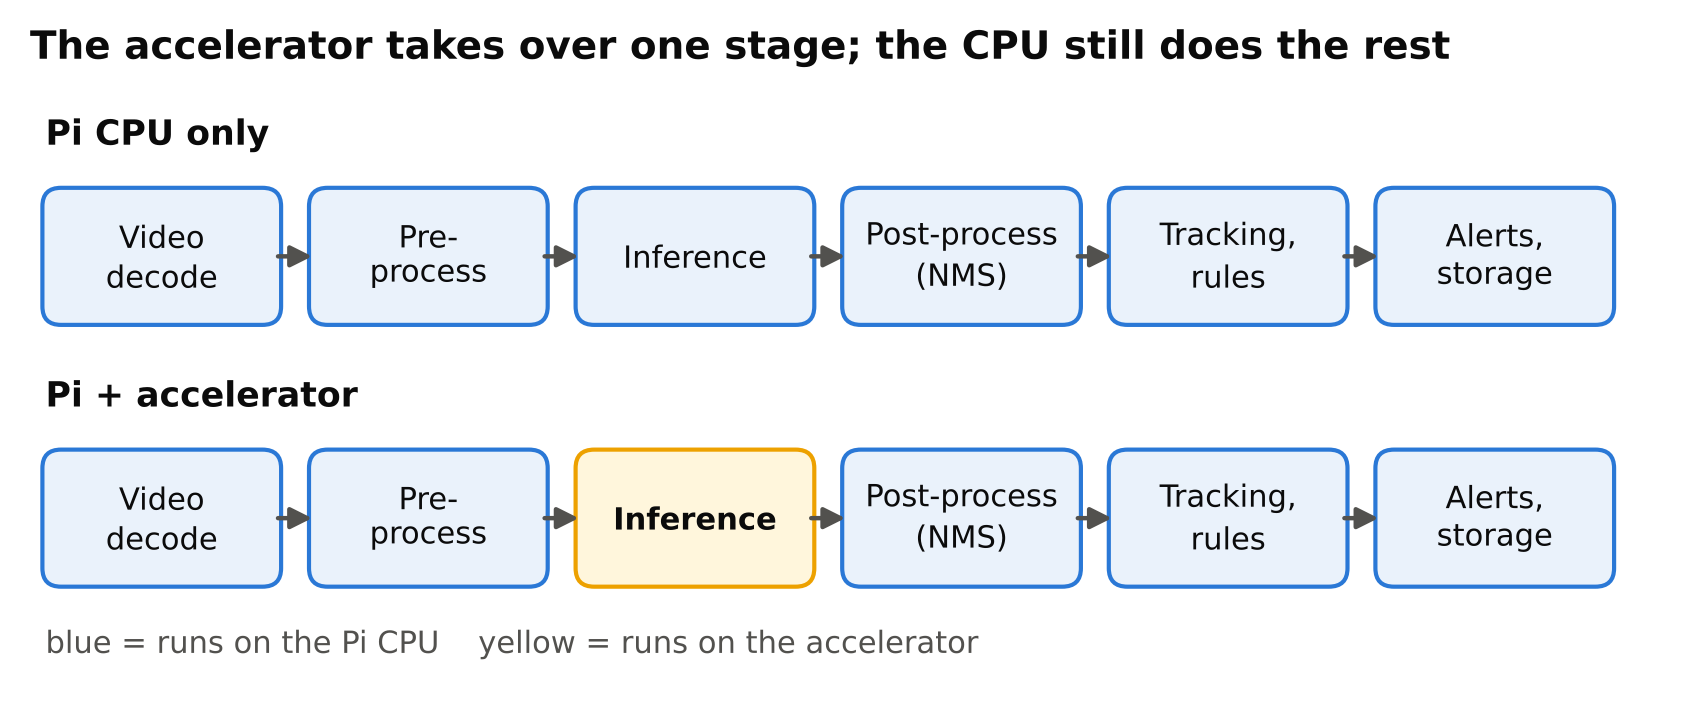
The accelerator runs neural network inference. It does not replace the Pi's CPU. The CPU still handles the operating system, video decoding, your application logic, tracking, alerts and anything the accelerator does not support.
What changes compared with CPU inference
Throughput and headroom
On a CPU, a detector competes with everything else on the board. With an accelerator, inference moves to dedicated hardware, which frees the CPU for decoding, tracking and logic. For projects with several streams or higher resolution, this can be the difference between working and not working. For projects with one low-rate stream, it may make no practical difference.
Power and heat
Dedicated accelerators are designed to deliver inference efficiently, often better per watt than a general CPU. That helps in enclosed or battery-powered setups. But the module still adds power draw and heat, so check your power supply and cooling. The official power supply is a sensible baseline, and the broader advice in power, cooling and storage for an edge AI box applies.
The toolchain
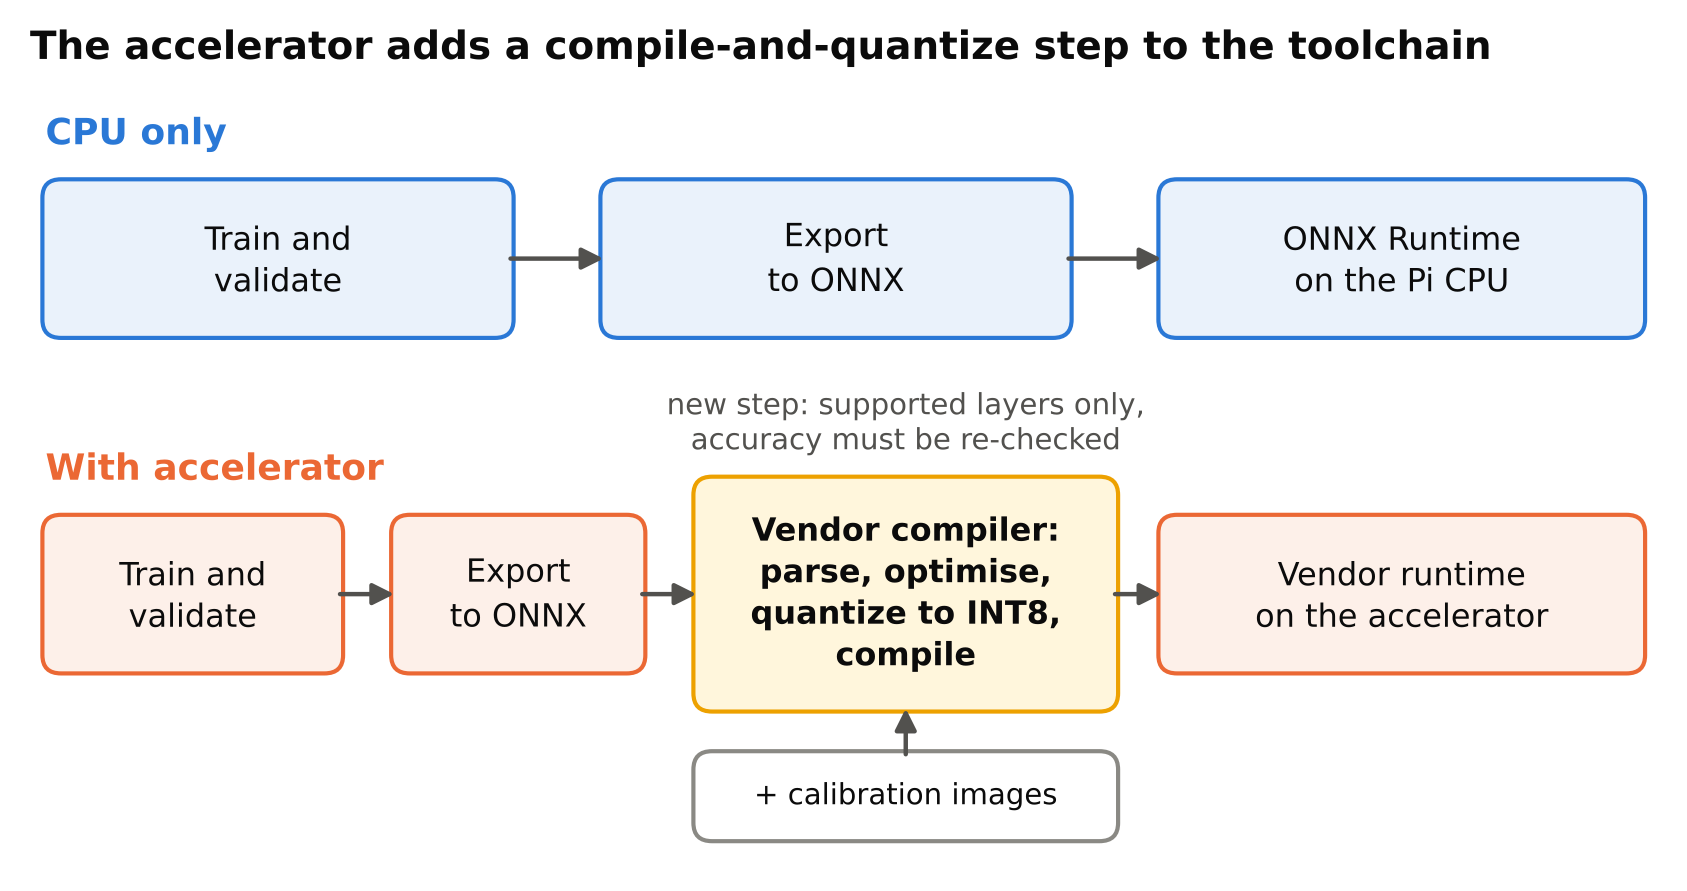
This is the biggest change. A CPU workflow looks like this: train in PyTorch, export to ONNX, run with ONNX Runtime. An accelerator workflow has another step: compile the model into the format the accelerator understands, using the vendor's tools.
In practice, you typically:
- Train and validate your model as usual.
- Export to ONNX.
- Use the vendor's compiler to parse, optimise, quantize (usually to INT8) and compile the model into a binary for the accelerator.
- Run it using the vendor's runtime and, on Raspberry Pi OS, the integration provided for the camera pipeline.
Quantization is part of step 3, and that means calibration data and accuracy checks. See INT8 quantization for detectors. The compiler may be designed for a different operating environment than your Pi, so check what the vendor currently recommends for the build step.
Trade-offs
| Topic | CPU only | With accelerator |
|---|---|---|
| Setup | Simple | More steps, vendor tools |
| Model flexibility | Any model you can export | Limited to supported operators and models |
| Throughput | Limited | Much higher for supported models |
| CPU load | High during inference | Lower, CPU free for other work |
| Accuracy | As trained | May drop after quantization, must test |
| Debugging | Familiar tools | Vendor-specific tools and formats |
| Cost | Board only | Board plus add-on |
Model support
Accelerators support a defined set of operations. Standard detectors, such as popular YOLO variants, usually have supported paths, and vendors often publish ready-made examples. But if you use a custom head, an unusual layer or a brand-new architecture, conversion can fail or run slower than expected. Check that your exact model family is supported before buying.
Accuracy after conversion
Quantization to INT8 can change results. Treat the compiled model as a new model: run your validation set through it, compare metrics and look at per-class results. Re-tune confidence thresholds if score distributions have shifted.
Lock-in
Your compiled model only runs on that accelerator. Keep the original weights and the ONNX file as your portable source so you can switch hardware later.
When a CPU is enough
You may not need an accelerator if:
- You process one stream at a low analysis rate, such as a few frames per second.
- The scene is simple and a small model reaches your accuracy target.
- Your latency requirement is relaxed. An alert a second late is fine.
- You value simplicity and a single common toolchain.
Many useful projects fit here: door counters, checking an indicator, simple occupancy. You can also reduce CPU load by skipping frames, lowering input size or using a smaller model. See choosing a YOLO model size. The article on running YOLO on a Raspberry Pi 5 shows how far you can go without extra hardware.
When an accelerator makes sense
Consider it when:
- Several cameras share one Pi.
- You need higher resolution or a larger model to meet accuracy requirements.
- CPU time is needed for other tasks, such as tracking and video encoding.
- The device must run continuously within a tight power or thermal budget.
- The model family you use has a supported conversion path.
If your needs go beyond that, for example many streams, multiple models in sequence or heavy GPU tooling, compare with a Jetson board. See Raspberry Pi vs Jetson Orin Nano.
How to try it with low risk
- Establish a CPU baseline. Measure end-to-end throughput and CPU load with your model on the Pi alone. Use the method in measuring FPS and latency correctly.
- Define the target. For example, "four streams at a set analysis rate with these accuracy numbers."
- Check model support in the vendor's current documentation.
- Compile and validate. Convert your model, then compare accuracy with the original on your own footage.
- Measure the full pipeline. Include decoding, pre-processing, post-processing and tracking. The accelerator speeds up only one stage.
- Test thermals over a long run with the case and cooling you will actually use. An active cooler is cheap compared with debugging throttling.
Common mistakes
- Buying before measuring. Without a CPU baseline, you cannot tell what the accelerator gained.
- Ignoring video decoding. Decoding several streams can limit you before the accelerator does.
- Skipping accuracy checks after quantization.
- Assuming any model will compile. Verify support first.
- Using a weak power supply. Add-ons increase demand, and brown-outs cause strange failures.
- Forgetting licences. Ultralytics YOLO models are AGPL-3.0, with a commercial licence available. Compiling a model for an accelerator does not change that, so check the current licence.
Verdict
The AI Kit is worth it when the CPU is demonstrably the bottleneck and your model has a supported path. It is not worth it as a default upgrade for a simple single-camera project. Measure first, then decide.
Checklist
- CPU baseline measured for throughput, CPU load and accuracy.
- Requirement written down (streams, resolution, rate, latency).
- Model family confirmed as supported in current vendor docs.
- Compiled model validated against the original on your data.
- Full pipeline measured, not only inference.
- Cooling and power tested under sustained load.
- Original weights and ONNX file kept.
Next steps
Read Running YOLO on a Raspberry Pi 5, then Power, Cooling and Storage for a Reliable Edge AI Box.