Preprocessing Mismatches That Silently Cost Accuracy
A model validated at a good mAP is exported, wrapped in production code, and quietly performs worse. There is no error. Boxes still appear, mostly in the right places. But confidence is lower, small objects are missed, and some classes are confused. Very often the network is fine and the input is not: production code prepares frames slightly differently from the training pipeline.
This article lists the mismatches that cause most of these losses and a simple test that catches all of them at once.
Why small differences matter
A network learns from inputs with a particular shape, colour order and value range. It has never seen anything else. If production feeds it stretched images, swapped colour channels or values on a different scale, it is effectively running on a different dataset. It will not fail loudly, because neural networks always produce some output. It will just be wrong more often.
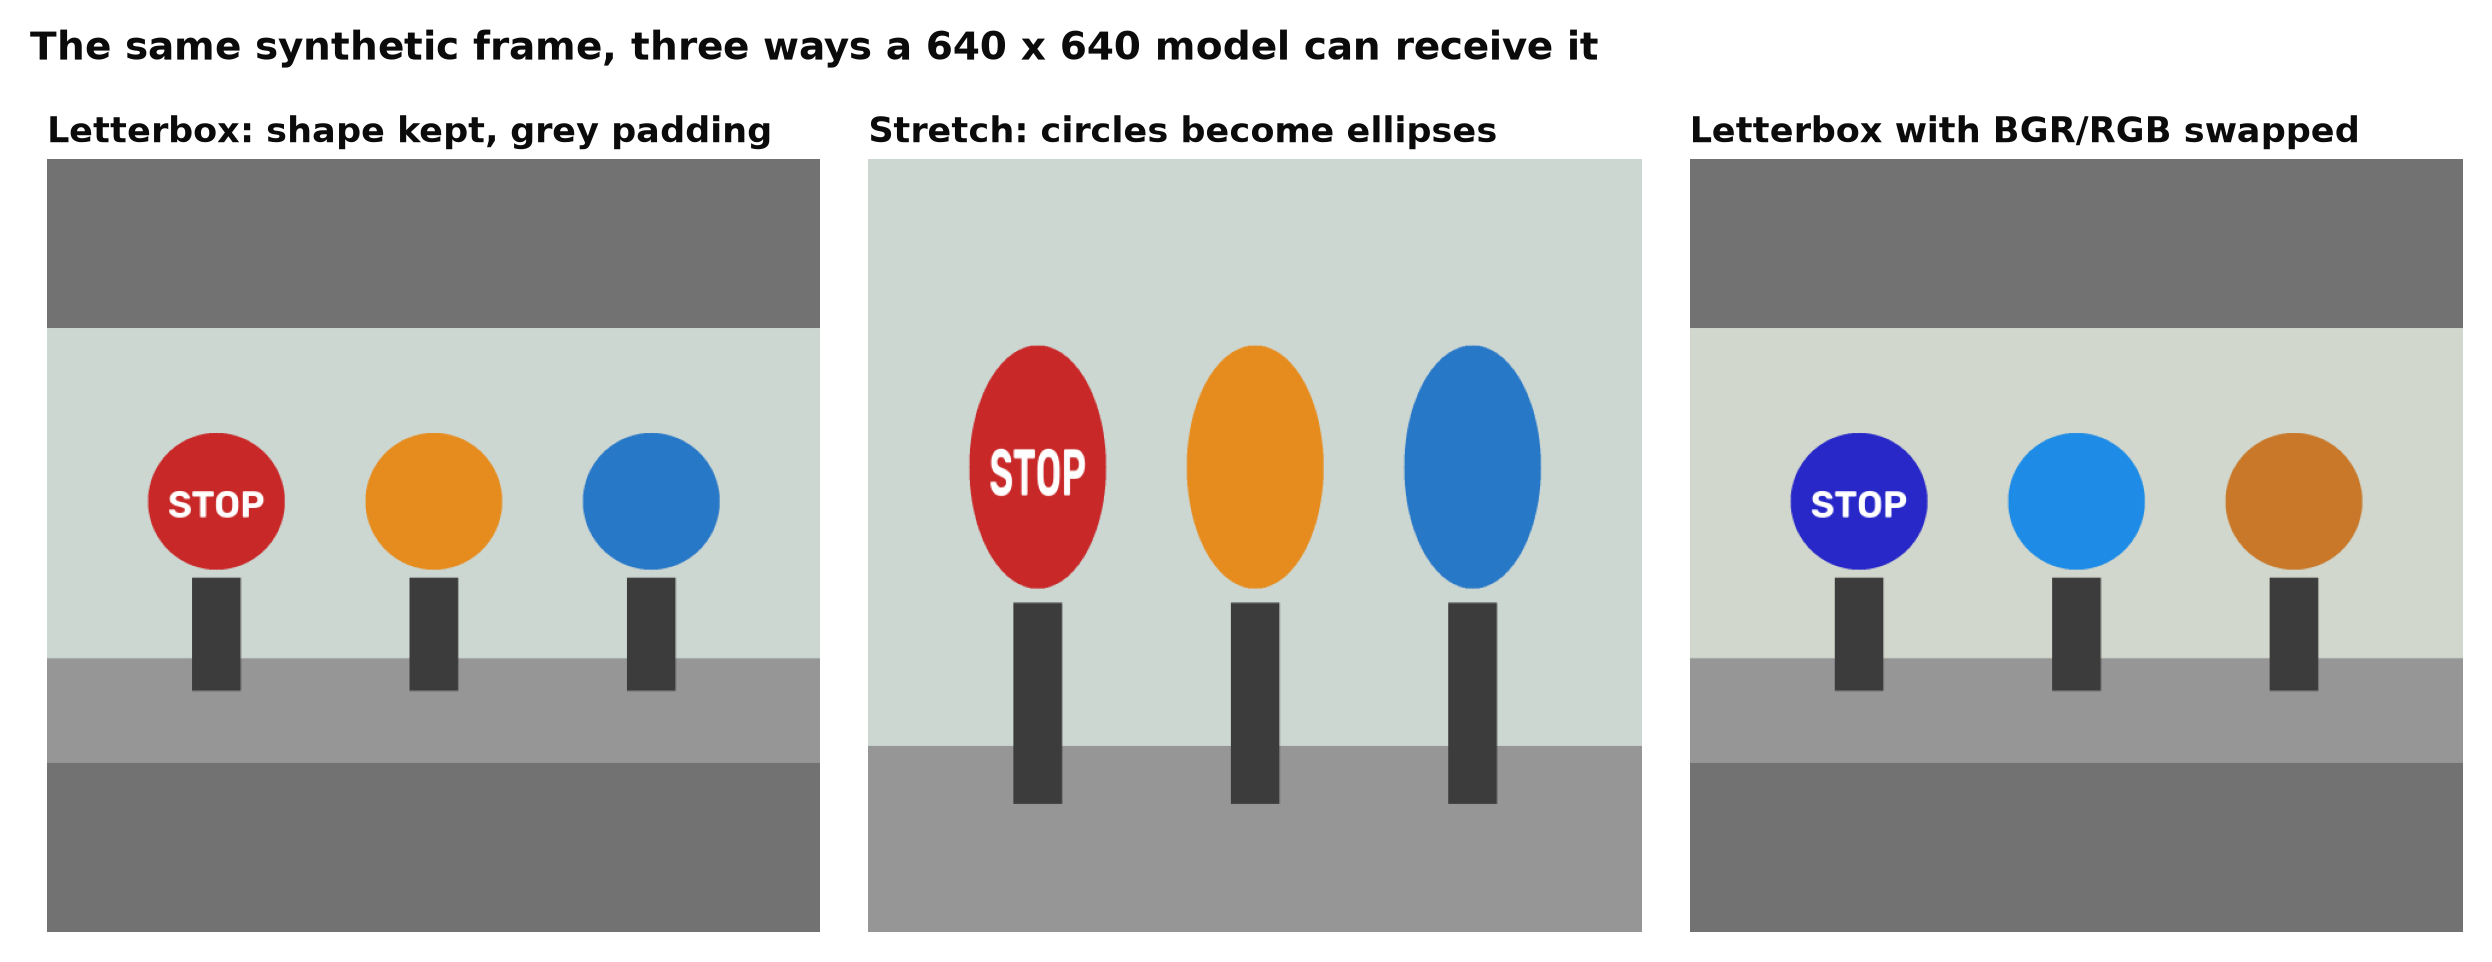
1. Letterbox versus stretch
Most YOLO pipelines, including Ultralytics, resize with a letterbox: scale the frame to fit the input while keeping its aspect ratio, then pad the rest with a constant grey (value 114 in Ultralytics). A common hand-written alternative is cv2.resize(frame, (640, 640)), which stretches a 16:9 frame to a square.
Stretching changes the shapes the model sees. People become taller and thinner, round objects become ellipses. A model trained on letterboxed images sees unfamiliar proportions and loses accuracy, especially on classes defined by shape.
The reverse mismatch also happens: training on stretched images and letterboxing in production. Whatever you choose, do the same in both places.
2. Mapping boxes back
After a letterbox, the model's box coordinates are in the padded, scaled input space. To draw them on the original frame, subtract the padding and divide by the scale. Two frequent bugs:
- Padding placed in the centre during pre-processing, but subtracted as if it were at the top-left (or the other way round).
- Using the width ratio for both axes when the scale was set by the height.
These bugs shift boxes rather than lose them, so detections look nearly right on a quick glance. They break zone and line rules, which depend on exact positions, and they make evaluation against ground truth look worse than the model really is. Test the round trip with a known box; Regression Tests for a Vision Pipeline shows how.
3. BGR versus RGB
OpenCV loads and decodes images in BGR channel order. PIL, most deep learning datasets and many models expect RGB. Ultralytics' predictor accepts NumPy arrays in BGR, as OpenCV produces, and handles the conversion. But once you export to ONNX or TensorRT and write your own pre-processing, the conversion is your job.
A swapped model still detects many objects, because shape carries a lot of information. Classes that depend on colour, such as a high-visibility vest, a red light or a coloured uniform, suffer most. Check with an image that has a strongly coloured object and confirm the tensor's first channel is red.
4. Value range and normalisation
Training pipelines scale pixel values in a specific way. YOLO models typically expect values from 0 to 1 (pixel divided by 255). Many classification backbones expect ImageNet normalisation: subtract a per-channel mean and divide by a per-channel standard deviation. Feeding 0 to 255 to a model that expects 0 to 1, or skipping a mean subtraction, shifts every activation in the network.
This one is usually dramatic, close to no detections at all, so it is found quickly. The subtler version is a second model in the pipeline, such as a classifier on detector crops, that expects a different normalisation from the detector.
5. Data type and layout
Exported models usually expect a float32 tensor in NCHW layout: batch, channels, height, width. OpenCV frames are uint8 in HWC layout. Forgetting the transpose gives a tensor of the right size and the wrong meaning. Some runtimes will reject the wrong shape; with a square input, the shape can match by accident. FP16 engines may expect FP16 input, depending on how they were built.
6. Interpolation and resize order
Different resize methods (nearest, bilinear, area) give slightly different pixels. The effect is usually small, but not always: nearest-neighbour downscaling produces aliasing that can hurt small objects. Match the training pipeline's method if you can.
Order matters for speed as well as accuracy. Resizing first and converting colour after is equivalent in output and much cheaper, because the conversion then runs on far fewer pixels. Profiling a Python Vision Pipeline shows the difference measured.
7. Training data that does not look like production frames
Some mismatches come from the data, not the code:
- Compression. Training images saved as heavily compressed JPEGs, production frames decoded from a high-bitrate stream, or the reverse.
- Orientation. Phone photos carry rotation in EXIF metadata. Some loaders apply it and some do not, so a labelled image and the pixels the model sees can disagree.
- Resolution path. Training frames extracted from the main stream, production running on the substream. See Main Stream or Substream.
- Input size. A model trained at 640 and run at 1280 sees objects at a scale it never learned. See Input Resolution or Model Size.
The test that catches all of it
Take a handful of real images. Run each through the training (or validation) pipeline's pre-processing and save the exact tensor the model received. Run the same images through your production pre-processing and save that tensor too. Then compare:
import numpy as np

a = np.load("reference_tensor.npy")    # from the training / validation pipeline
b = np.load("production_tensor.npy")   # from your deployment code, same image
print(a.shape, b.shape, a.dtype, b.dtype)
print("max abs difference:", np.abs(a.astype(np.float32) - b.astype(np.float32)).max())
Shape, dtype and values should match closely. Small differences from resize implementations are expected. Large differences, or differences concentrated in one channel or along the edges, point to one of the mismatches above.
Then compare outputs: run the reference model on the reference tensor and the exported model on the production tensor, and match the boxes. If tensors match but boxes do not, the problem is in the export or post-processing, not the input. Export YOLO to ONNX and Run It with ONNX Runtime covers checking an export.
Add this comparison to your automated tests, so a future refactor cannot reintroduce the bug.
Checklist
- Same resize method (letterbox or stretch) in training and production.
- Same padding value and position, and correct box mapping back.
- Colour order converted correctly for exported models.
- Same value scaling and normalisation, for every model in the pipeline.
- Correct dtype and NCHW layout.
- Training images resemble production frames in compression, orientation and resolution.
- Tensor comparison between training and production pre-processing in your tests.
Next steps: Export YOLO to ONNX and Run It with ONNX Runtime and Comparing Two Detectors Fairly.