Setting Up a Clean Python Environment for Computer Vision
Many computer vision problems that look like model problems are really environment problems. A package updated and the output changed. PyTorch cannot see the GPU. Two libraries want different versions of NumPy. A project that worked last month fails on a fresh machine.
A clean, pinned environment prevents most of this. It takes about ten minutes to set up and saves a lot of time later.
One environment per project
Never install everything into the system Python. Create a separate virtual environment for each project, so that upgrading a library for one project cannot break another.
python3 -m venv .venv
source .venv/bin/activate        # Windows: .venv\Scripts\activate
python -m pip install --upgrade pip
Keep the environment folder inside or next to the project, and add it to .gitignore. You never commit it. You commit the file that describes it.
Tools like conda are also fine, especially when you need non-Python dependencies. The principle is the same: isolate, and record what is installed. Pick one tool per project and stay with it.
Choose the Python version deliberately
Libraries support a range of Python versions, and the newest Python release is often not yet supported by every deep learning package. Check the install instructions for PyTorch and for any other key library before you pick a version. A version that is a little behind the newest is usually the safer choice for production. Write the version you chose in your README.
Install PyTorch the right way
PyTorch is the part most likely to go wrong, because the build must match your hardware.
- For a CPU-only machine, a CPU build is enough.
- For an NVIDIA GPU, you need a build compiled for a CUDA version your driver supports.
The reliable approach is to use the official install selector on the PyTorch website. You choose your operating system, package manager and compute platform, and it gives you the exact command. Run that command first, before installing other libraries, because other packages may pull in a different PyTorch build as a dependency.
Then check what you got:
import torch
print(torch.__version__)
print(torch.cuda.is_available())
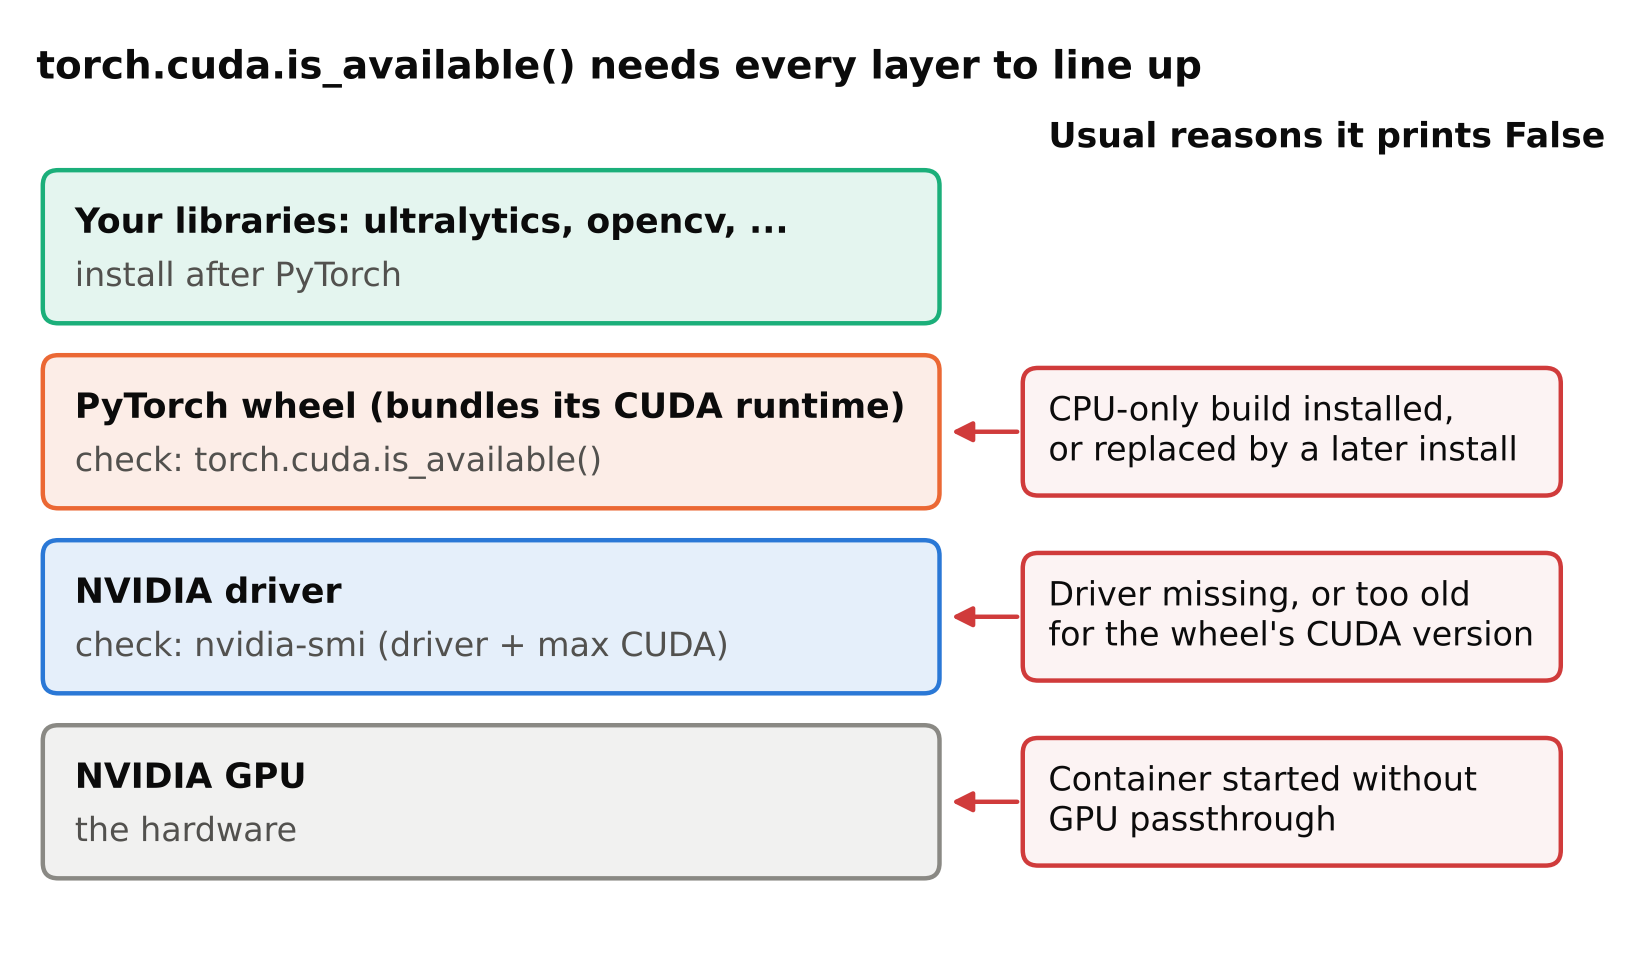
If torch.cuda.is_available() prints False on a machine with an NVIDIA GPU, the usual causes are:
- A CPU-only PyTorch build was installed.
- The NVIDIA driver is missing or too old for the CUDA version the build uses.
- In a container, the GPU was not passed through to it.
Fix the first by reinstalling with the correct command. Check the second with nvidia-smi, which shows the driver and the highest CUDA version it supports. Note that the PyTorch wheels bundle their own CUDA runtime, so you usually do not need to install a full CUDA toolkit just to run PyTorch. You do need a recent enough driver.
On edge devices, such as NVIDIA Jetson boards, the rules are different. Those devices have their own vendor-supplied PyTorch builds matched to the system image, and installing a generic wheel from the normal index may not work. Follow the vendor's instructions for your exact software release. The same goes for Raspberry Pi, where you often run an exported model with ONNX Runtime and skip PyTorch entirely. See running YOLO on a Raspberry Pi 5.
Record exactly what you installed
Installing is not enough. You must be able to repeat it. There are two levels.
Direct requirements. A short requirements.txt listing what you chose, with versions:
ultralytics==<version you tested>
opencv-python-headless==<version you tested>
onnxruntime==<version you tested>
numpy==<version you tested>
Replace the placeholders with the versions you actually used. You can see them with pip list or pip show <package>.
Full snapshot. pip freeze > requirements.lock.txt records every installed package including indirect dependencies. This is the file that rebuilds the exact environment. Many teams keep both: the short file to show intent, the full one to reproduce.
Install from the file with pip install -r requirements.txt. For PyTorch, keep the install command in the README because the right wheel source depends on the machine, and it may differ from the plain index.
Pinning has a cost. You must update versions on purpose, read release notes, and test. That is a good trade for anything that runs in production, and unneeded overhead for a throwaway notebook.
OpenCV package conflicts
As covered in OpenCV essentials, install only one of opencv-python and opencv-python-headless. Some libraries list one of them as a dependency, so after installing, run pip list and check you do not have both. If you do, uninstall both and reinstall the one you want.
Keep training and deployment environments separate
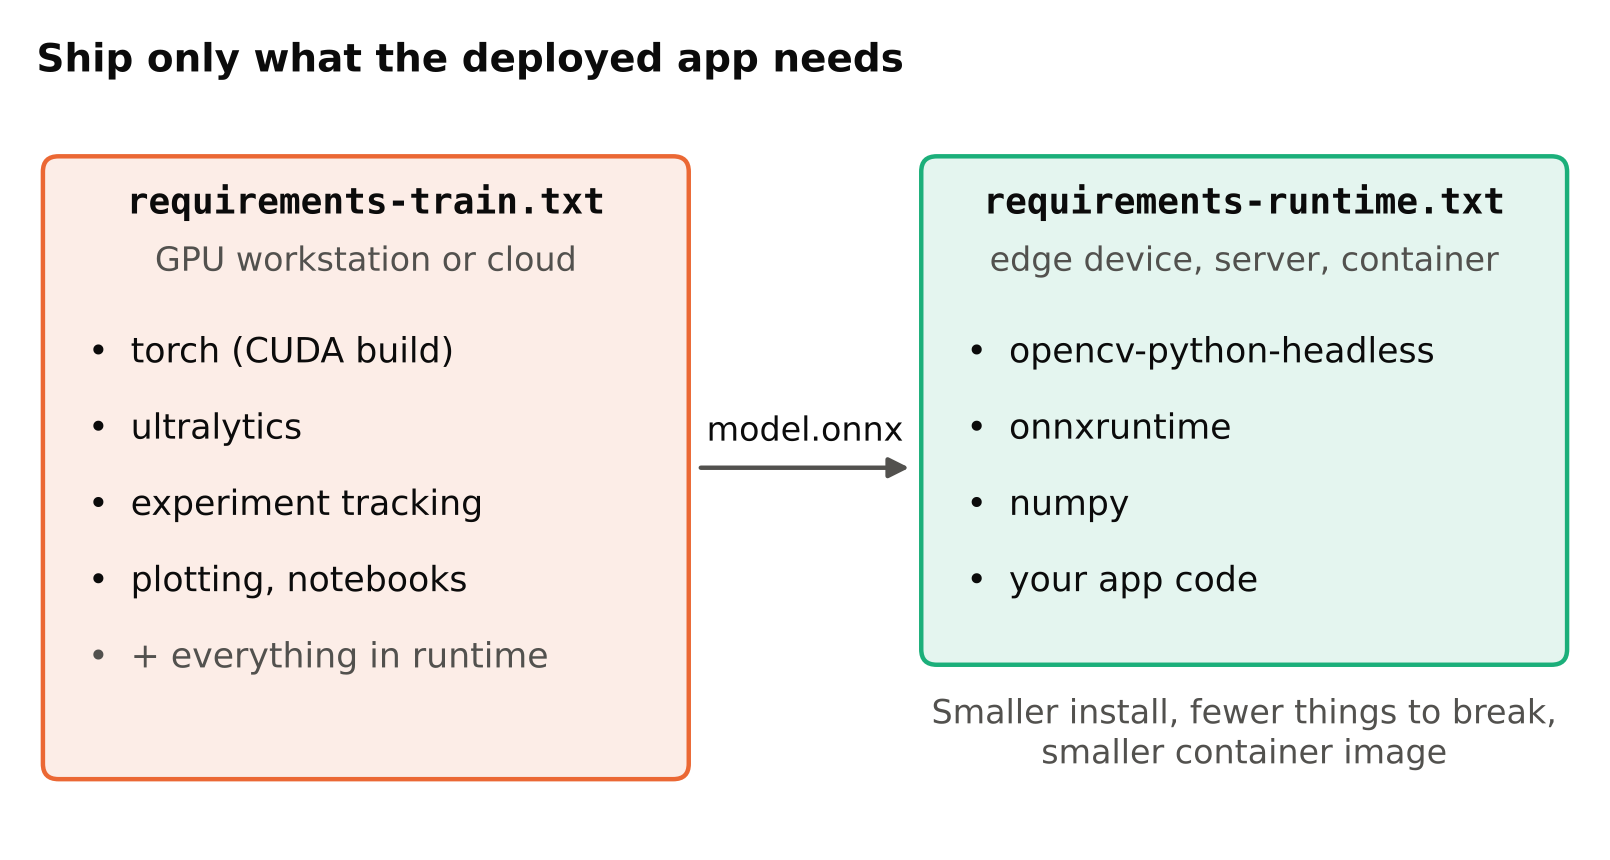
Training needs large packages: PyTorch, experiment tools, plotting libraries, a CUDA-enabled build. A deployed edge or server app often needs much less: OpenCV, ONNX Runtime, NumPy and your own code.
Use two requirement files, for example requirements-train.txt and requirements-runtime.txt. A smaller runtime environment installs faster, uses less disk, has fewer things that can break, and gives a smaller container image. This is also easier to secure and update. The patterns for packaging are in how to dockerize a computer vision app.
Make results reproducible
An environment alone does not make a result reproducible. Also record:
- The random seed, where your tool lets you set one.
- The dataset version.
- The exact command used to train.
- The git commit of your code.
Even with a seed, GPU operations can be non-deterministic, so two runs may differ slightly. Treat small differences as normal, and use tracking to record each run. See experiment tracking with TensorBoard, Weights & Biases and MLflow.
Common mistakes
- Installing into the system Python. One upgrade breaks something unrelated.
- Installing PyTorch last. Another package replaces it with a CPU build.
- Using
pip installwith no versions in a project that others will run. Their install may differ from yours. - Mixing
pipandcondacarelessly in the same environment. If you must mix, install conda packages first and pip packages after. - Forgetting to activate the environment. If
which python(orwhere pythonon Windows) points outside your project, you are not in it. - Copying the
.venvfolder to another machine. Virtual environments are not portable. Rebuild from the requirements file. - Never updating. Pinned versions that are years old miss bug fixes and security updates. Schedule an occasional review.
A quick test script
Keep a small check_env.py in the repo that prints the Python version, imports your key libraries, prints their versions, and reports whether a GPU is visible. Run it after any install, and in CI or on a new machine. It turns "it does not work" into a specific line of output.
Checklist
- One virtual environment per project, outside version control.
- Choose a Python version that your key libraries support.
- Install PyTorch first, using the official selector command for your hardware.
- Check
torch.cuda.is_available()andnvidia-smion GPU machines. - Keep a pinned
requirements.txtand a fullpip freezesnapshot. - Install only one OpenCV package.
- Separate training and runtime requirements.
- Record seed, dataset version, command and commit with each run.
Next steps: training on Google Colab, dockerize a computer vision app.