Host Computer Vision Demos for Free on GitHub Pages
A working demo is more convincing than a screenshot. A person can open a link, try your model on an image, and see what it does. GitHub Pages lets you host such a demo for free, as long as the demo is a static site. This article explains how to build one, what the limits are, and what to watch out for with licences and privacy.
What GitHub Pages can and cannot do
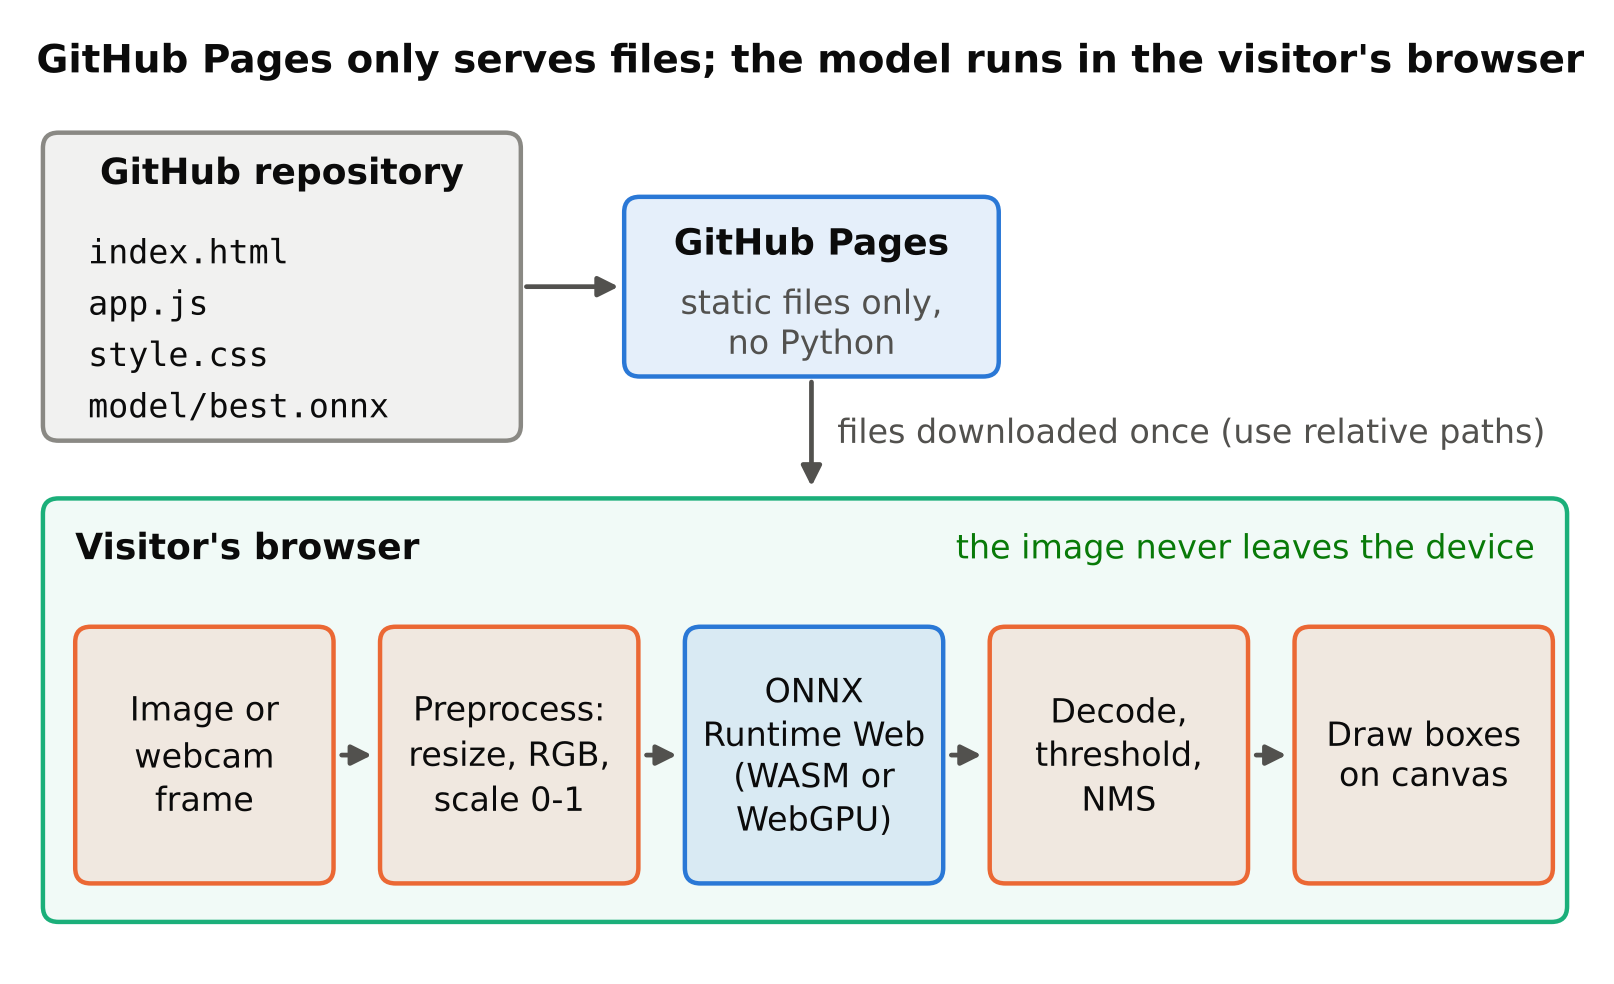
GitHub Pages serves static files: HTML, CSS, JavaScript, images, and data files such as model weights. It does not run Python or any other server code. So you cannot host a Flask or FastAPI app there.
That sounds limiting, but computer vision has a good answer: run the model in the visitor's browser. The page loads a model file, and JavaScript runs inference locally using WebAssembly or WebGPU. Nothing is sent to a server. The technique is covered in running object detection in the browser with ONNX Runtime Web.
For a model that needs a real server, such as a large model or a live camera feed, you need a different host. A static page can still act as the front end and call an API that you host elsewhere.
Check GitHub's current documentation for the size limits on repositories and published sites, and the usage rules for Pages. They change, and a very large model file may not fit comfortably.
The plan
- Train a small model and export it to ONNX.
- Build a page that loads an image (or webcam frame), preprocesses it, runs the model, and draws boxes.
- Put the files in a GitHub repository.
- Turn on GitHub Pages for that repository.
Step 1: choose a model that fits the browser
Browser demos work best with small models. A nano-sized detector at a modest input size downloads quickly and runs acceptably on most laptops. Larger models take longer to download and run, and may be slow on phones. See choosing a YOLO model size for how to trade accuracy against cost.
Export with Ultralytics:
from ultralytics import YOLO

model = YOLO("best.pt")
model.export(format="onnx", imgsz=640)
Test the exported file in Python with ONNX Runtime first. If the Python output is wrong, the browser output will be wrong too, and Python is far easier to debug. The export and checking steps are in exporting YOLO to ONNX.
Step 2: build the page
A minimal structure:
my-demo/
  index.html
  app.js
  style.css
  model/best.onnx
The JavaScript does the following:
- Loads the model with ONNX Runtime Web.
- Reads an image from a file input or a canvas.
- Resizes it to the model input size and converts pixel values into the tensor layout the model expects (the preprocessing must match training).
- Runs the model and decodes the output into boxes.
- Applies a confidence threshold and non-maximum suppression, then draws results on a canvas.
The decoding step is the one that trips people up. The raw output of an exported detector is not a neat list of boxes. You must know its shape and meaning for your model version. Print the output shape in Python, and port exactly that logic. For background on the filtering step, see IoU and non-maximum suppression.
Use relative paths for the model and scripts, because Pages serves a project site under a sub-path such as /repo-name/. An absolute path starting with / will break there.
Step 3: publish
Push the repository to GitHub. In the repository settings, open the Pages section and choose to publish from a branch (and folder) that contains your index.html. After a short wait, the site becomes available at an address based on your username and repository name. Check GitHub's documentation for the current steps, since the settings screens change over time.
If you want your own address, you can add a custom domain. That needs a domain name and DNS settings, and it is optional. The default address is fine for a demo.
Things that go wrong
- Model file not loading. Check the browser's developer console. Common causes are a wrong path, a very large file, or opening
index.htmldirectly from disk. Browsers restrict loading local files, so test with a small local web server (for examplepython -m http.server) instead. - Wrong colours or wrong results. The channel order, scaling (0-255 vs 0-1) or input size differs from the training pipeline. Compare against Python on the same image.
- Slow first run. The model must download and initialise. Show a loading message so people do not think the page is broken.
- Memory errors on phones. Reduce the input size or use a smaller model.
- Stale cache. After you replace the model, browsers may keep the old one. Rename the file or add a version in its name.
Licensing
Check the licence of everything you publish. If your model came from Ultralytics YOLOv5 or later generations, it falls under AGPL-3.0, and a commercial licence is available from Ultralytics. YOLOv7 is GPL-3.0. Publishing model weights and code in a public repository is a form of distribution, so read the terms and decide how to licence your repository. Check the current licence for the exact version you use. This is not legal advice, and a deeper look is in YOLO licences explained.
Also check your data. Do not publish images you do not have the right to share, and do not ship a demo that contains private footage. For sample images, use ones you own or that carry a licence that allows redistribution.
Privacy: an advantage of browser demos
If inference runs in the browser, uploaded images never leave the visitor's device. You can say so on the page, but only if it is true, so check that your code makes no network calls with user images. This is a real benefit for demos that involve photos of people. See privacy and ethics in camera analytics for related habits.
Make the demo useful, not just working
A demo that shows a portfolio-worthy result has a few extras:
- Sample images, so visitors do not need their own.
- A plain description of the task, the data, and what the model cannot do.
- An honest note on known failure cases.
- A link to the code repository and to a write-up.
- A confidence slider, which lets visitors see the trade-off for themselves.
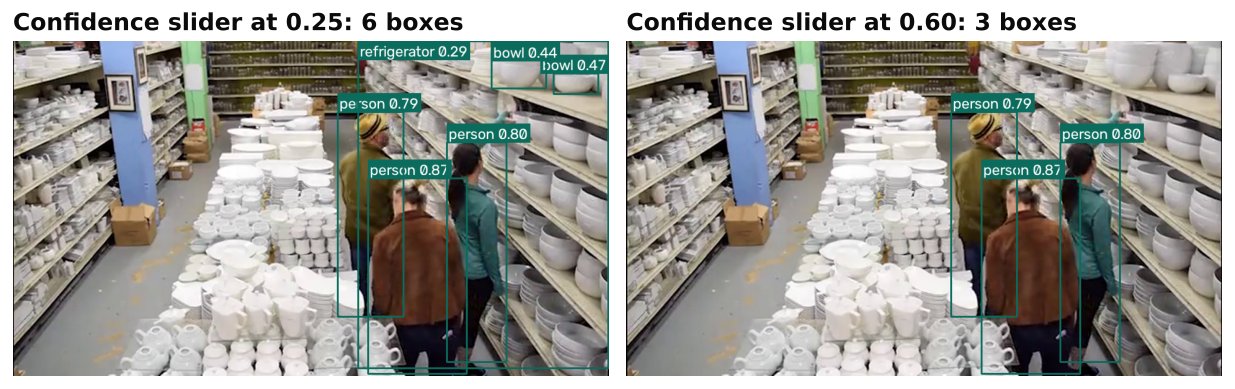
Be careful not to claim accuracy you have not measured on real held-out data. A demo on a few chosen images can make any model look good. How to present results honestly is covered in building a computer vision portfolio that gets clients.
Checklist
- Use a static site; run the model client-side with ONNX Runtime Web.
- Pick a small model and a modest input size.
- Verify the exported ONNX model in Python before touching JavaScript.
- Match preprocessing and output decoding to the Python version.
- Use relative paths; test with a local web server.
- Check current GitHub Pages size limits and usage rules.
- Check licences for the model, code and sample images.
- Add sample images, a short description, and honest limitations.
Next steps: running object detection in the browser with ONNX Runtime Web, building a portfolio that gets clients.