Writing an Annotation Guide Labellers Can Follow
Give two people the same image and ask them to box every person, and they will disagree. One includes the bag a person carries; the other does not. One boxes a person seen only from the waist up behind a counter; the other skips them. One labels the reflection in the glass door. Neither is wrong, because nobody told them.
Inconsistent labels teach a model inconsistent rules, and they make your test set less trustworthy. The fix is cheap: a written annotation guide that answers these questions before they are asked. This article describes what to put in one and how to keep it useful.
Who the guide is for
Write for a careful person who has never seen your project, does not know the client, and will label thousands of images in a row. They may work remotely, in another language, and long after you wrote the guide. Everything they need to decide must be in the document, with pictures.
It also serves you. Writing the guide forces you to decide what the classes really are, and those decisions often reveal that the task as described was not well defined.
What to put in it
1. The purpose, in two sentences
"These labels train a model that alerts when a person enters a restricted zone near machinery. Missing a person is worse than an extra box." A labeller who knows the purpose makes better calls on cases the guide did not foresee.
2. Class definitions
For each class: a one-line definition, what is included, what is excluded, and at least three example images. Be explicit about the boundaries:
- Is a mannequin a person? A person on a poster or screen? A reflection?
- Is a forklift carrying a pallet one object or two?
- Does "helmet" mean any hard hat, or only the site-approved type? What about a cap?
If two classes are often confused, put examples of both side by side.
3. Box rules
How to draw the box matters as much as which objects get one.
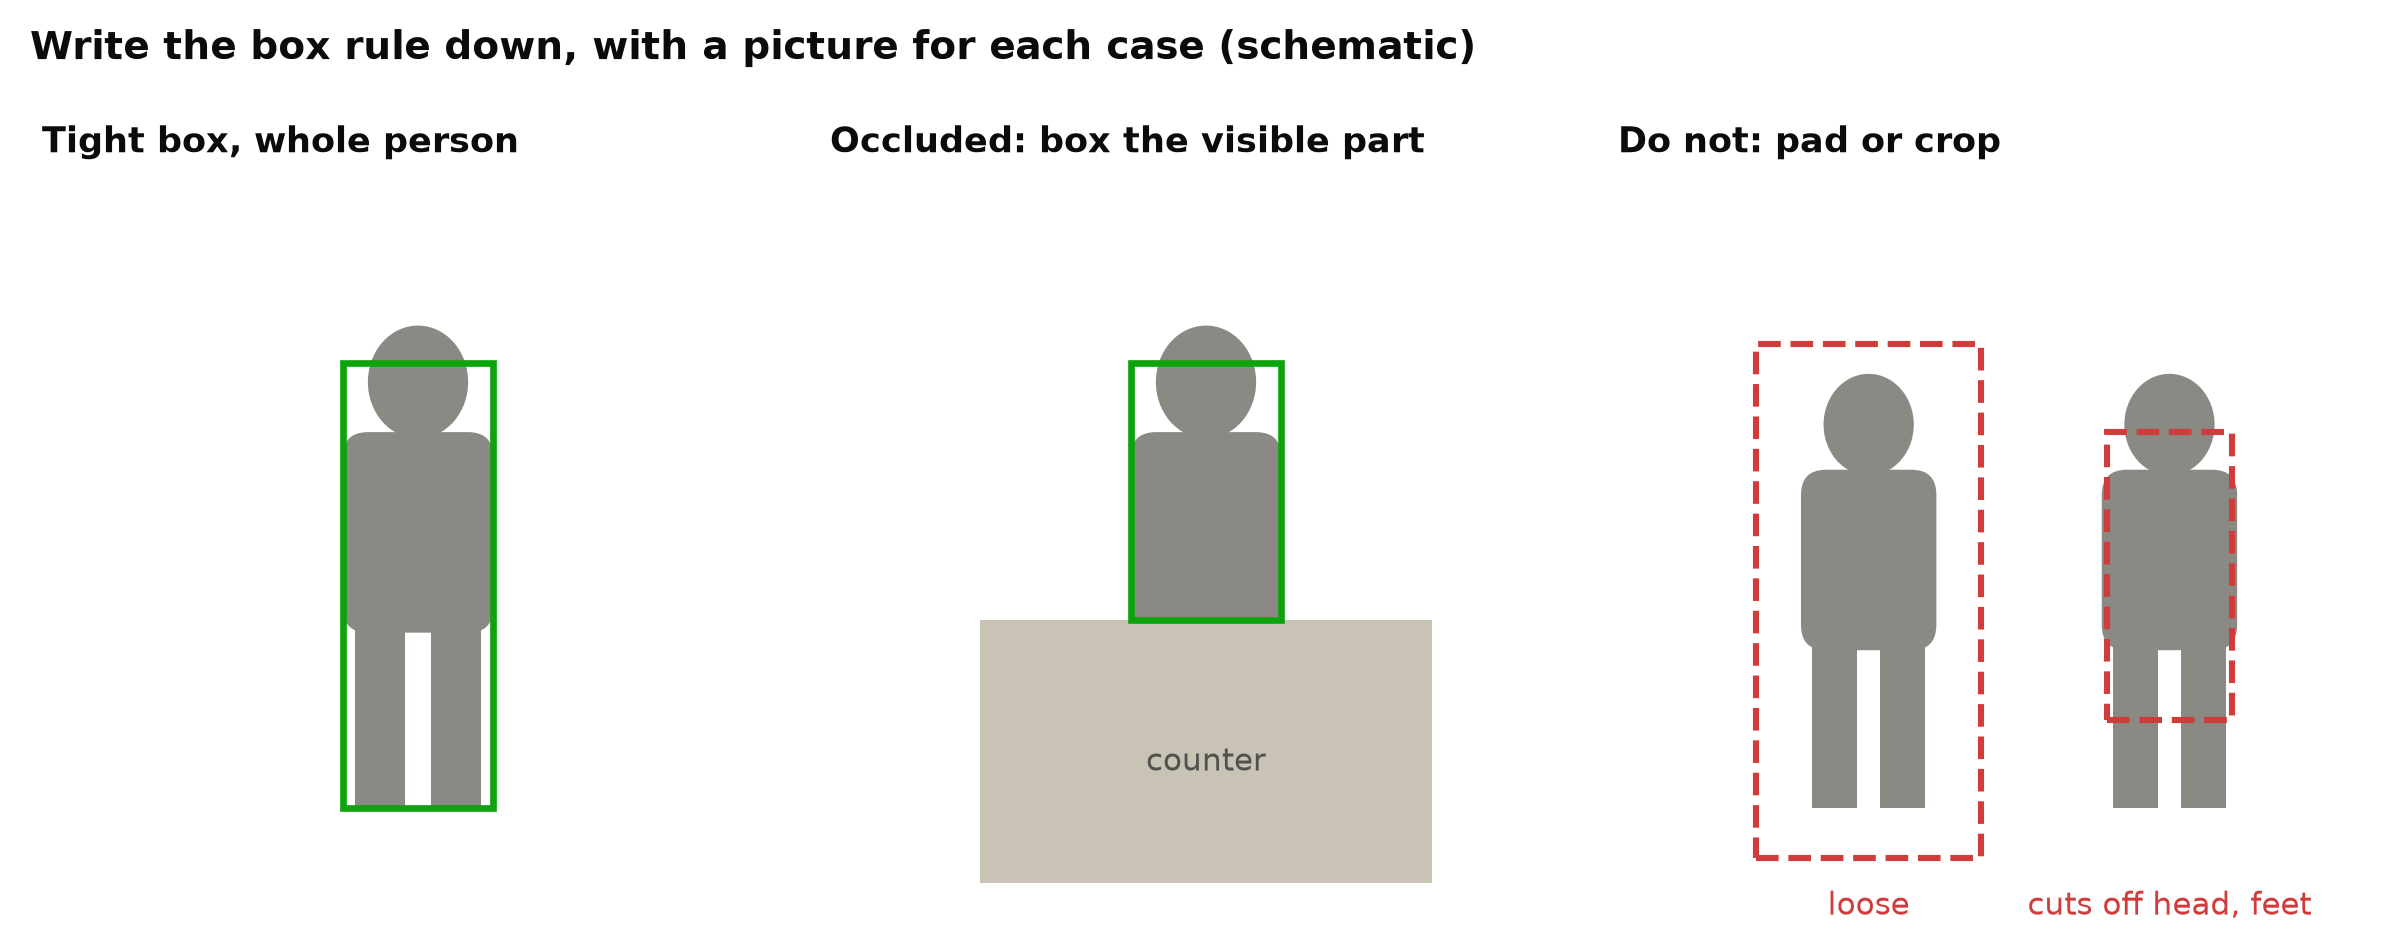
Decide and show:
- Tightness. Box edges touch the outermost visible pixels of the object, no margin.
- Occlusion. Box the visible part only, or the estimated full extent. Either can be right; mixing them is not. Visible-part boxes are easier to draw consistently.
- Carried and attached items. Does a person's box include a carried box, an umbrella, a trolley they push?
- Truncation at the frame edge. Box what is visible inside the frame.
- Groups. If people overlap heavily, box each one you can separate. Say what to do when you cannot.
4. What not to label, and ignore regions
Set a minimum size below which objects are not labelled, in pixels on the original image, and explain why: tiny objects that nobody can identify confidently make noisy labels. Better still, mark them as an ignore region if your tool and training setup support it, so the model is neither rewarded nor punished for them.
The same applies to objects that are too blurred or dark to be sure of. "If you cannot tell what it is, mark it ignore" is better than forcing a guess.
5. Hard cases, with answers
Collect a page of difficult examples with the correct labelling shown: night infrared images, motion blur, people half inside a doorway, a person bent over, reflections, crowded scenes. This section will grow faster than any other.
6. The tool workflow
Which tool, which project, how to mark an image as done, how to flag one for review, what to do with corrupted or irrelevant images, how to ask a question. Short and practical. CVAT vs Label Studio vs Roboflow covers tool choice.
Pictures beat paragraphs
Every rule should have an example image, and every hard case should have a picture of the right answer. A sentence like "box the visible part of occluded people" is read in different ways; a picture of a person behind a counter with the correct box is not.
Use real images from the project's cameras where privacy rules allow, so the examples look like what labellers will see.
Test the guide before scaling up
Before labelling thousands of images, run a pilot:
- Give the guide and the same 50 to 100 images to two or three labellers, separately.
- Compare their labels: missed objects, extra objects, class disagreements, box differences.
- Every disagreement points at a gap in the guide. Fix the guide, not only the labels.
- Repeat until agreement is good enough for the purpose.
Measuring Label Quality with Annotator Agreement shows how to put numbers on the comparison.
Keep it alive
Questions keep coming during labelling. Handle them like this:
- Keep a single place for questions, and answer them in writing.
- When an answer sets a new rule, add it to the guide with an example image.
- Give the guide a version number and a change log.
- When a rule changes, decide whether existing labels must be revised. If not, at least record which dataset versions were labelled under which guide version. See Versioning Datasets and Models Together.
A guide that is written once and never updated drifts away from what labellers actually do.
Common mistakes
- No negative examples. Saying what is a person without showing what is not.
- Rules without reasons. Labellers apply reasoned rules better to new cases.
- Changing rules silently. Labels before and after the change no longer agree.
- Guide too long. Put the essential rules on the first two pages and the detail after.
- Different rules for test data. The test set must follow the same guide as training data, or test scores measure guideline differences. See Annotation Mistakes That Quietly Ruin Your Model.
Checklist
- Purpose stated in two sentences.
- Each class defined with inclusions, exclusions and example images.
- Box rules for tightness, occlusion, attached items, truncation and groups.
- Minimum size and ignore rules.
- A hard-cases section with pictured answers.
- Tool workflow and a way to ask questions.
- Pilot with several labellers before scaling.
- Versioned, with a change log.
Next steps: Measuring Label Quality with Annotator Agreement and Annotation Mistakes That Quietly Ruin Your Model.