When the Customer's Footage Doesn't Match the Demo
The demo went well. The model found every person and every helmet in the sample clips, the client was impressed, and the project started. Then the first real footage arrived: cameras mounted at six metres, a fisheye lens in the warehouse, heavy compression, and half the hours at night under infrared. The model that looked perfect now misses a third of what matters.
This is one of the most common moments in applied computer vision, and handled badly it sinks projects. This article covers why it happens, how to measure the gap quickly, how to explain it to a client, and what the options are.
Why demo footage is always easier
Demo footage is chosen to show the system at its best, even when nobody means it to be. Public sample videos, the clips a vendor uses, and the footage people film to try a model all tend to share traits:
- Cameras at eye level or slightly above, so people look like people in photos.
- Objects that are large in the frame.
- Good daylight, often outdoors or in a bright shop.
- High bitrate, because it was recorded for viewing, not for a 24-hour recorder.
- Common objects, of the kind found in public datasets.
Real site cameras are installed for coverage and for security staff, not for models. They are mounted high to see over shelves, use wide lenses to cover more area, run substreams at low bitrate to save storage, and switch to monochrome infrared at night. Every one of these makes detection harder.
Measure the gap in the first week
Do not argue from impressions. As soon as you have real footage, measure:
- Pixels on target. How tall is a typical target, in pixels, at the model's input size, at the near, middle and far ends of the area the client cares about?
- Baseline performance. Run the existing model on a sample of real footage and label a small set: a few hundred frames or a few dozen events, including night. Count hits, misses and false detections.
- Conditions. List what differs from the demo: angle, lens, resolution, bitrate, lighting, night mode, occlusion, object types.
Pixels on target is the quickest to check and often explains most of the gap. It follows from simple geometry: the camera's vertical field of view covers a height of about 2 × distance × tan(field of view / 2) at a given distance, and a target gets its share of the image's pixel rows. Then the model's resize shrinks it further.
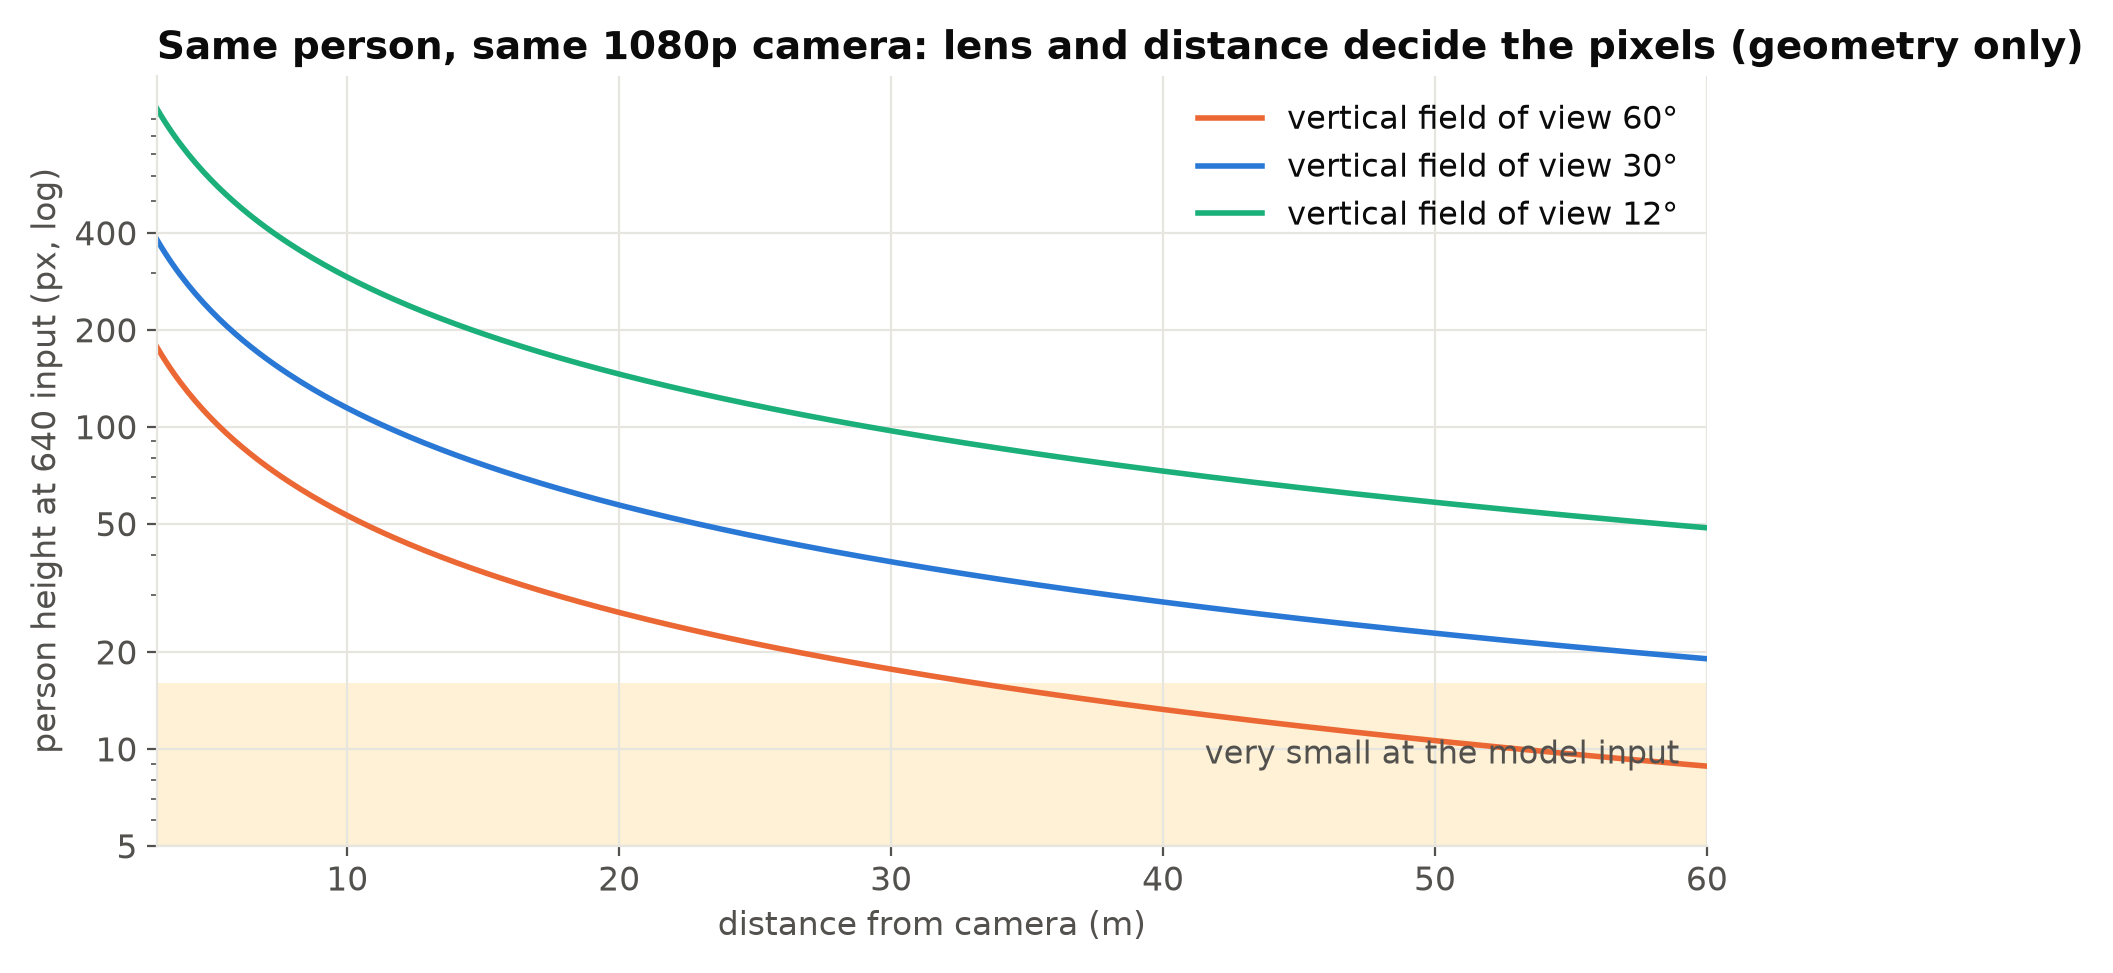
For example, a 1080p camera with a 30-degree vertical field of view sees a height of about 10.7 m at 20 m. A 1.7 m person covers about 171 of the 1080 rows. Resized from 1920 × 1080 to a 640-pixel model input, that becomes about 57 pixels: workable. Put the same person at 40 m with a 60-degree lens and they are under 15 pixels: very hard for any detector, and impossible for small details such as a helmet.
Explain it in terms the client can see
Clients usually understand the problem immediately when you show it, and rarely when you describe it. Prepare:
- Side-by-side frames: a demo frame and a real frame from their camera, with the target marked. The size difference speaks for itself.
- A crop at model resolution: what the model actually sees of a person at the far end of their area.
- The baseline numbers: "on 40 events from cameras 2 and 5, the current model detects 26; most misses are beyond 25 metres or at night."
- The causes, in order of impact, and which ones can be changed.
Be direct and early. A client told in week one that their cameras need work is an ally. A client told in week eight that the system will not meet the target feels misled, even if the cause is the same.
The options
There are four broad options, and most projects use a mix.
Change the cameras or their settings. Often the cheapest fix overall, and the most effective. Use the main stream instead of the substream, raise the bitrate, adjust the zoom, re-aim a camera, add lighting, add a camera for the far area. See Choosing a Camera for Computer Vision Projects and Main Stream or Substream.
Adapt the model to the footage. Fine-tune on labelled frames from the client's own cameras, including night. This usually closes a good part of the gap caused by angle, lighting and compression. It cannot create detail that is not in the pixels. See Fine-Tuning YOLO.
Change the processing. Higher input resolution, tiling large frames, or cropping to the region of interest put more pixels on small targets, at a cost in compute. See Input Resolution or Model Size.
Change the scope. Cover a smaller area per camera, drop a detail that cannot be seen (such as helmet colour at 40 metres), or accept lower recall at night. A narrower system that works is worth more than a broad one that does not.
Put each option to the client with its cost and the gain you expect, and be honest about which gains are estimates.
Prevent it next time
Most of this pain can be moved to before the contract:
- Ask for real footage from the actual cameras, including night, before quoting. A few minutes per camera is enough to spot trouble.
- Do a short paid discovery phase that includes a baseline run on that footage. See Freelancing in Computer Vision.
- Agree the target only after discovery, on the client's footage. See Agreeing a Measurable Target with a Client.
- Visit or survey the site where possible. Site Surveys: What to Check Before Promising a Result has a list.
- Never let a demo on sample video stand in for evidence on the client's cameras, in your own mind or in theirs.
Checklist
- Measure pixels on target at near, middle and far distances.
- Run the baseline model on real footage, including night, and count results.
- List the differences from the demo, in order of impact.
- Show the client side-by-side frames and crops at model resolution.
- Present camera, model, processing and scope options with costs.
- Raise the issue in the first week, not at the deadline.
- Get real footage before quoting next time.
Next steps: Site Surveys: What to Check Before Promising a Result and Fine-Tuning YOLO: Transfer Learning Explained.